
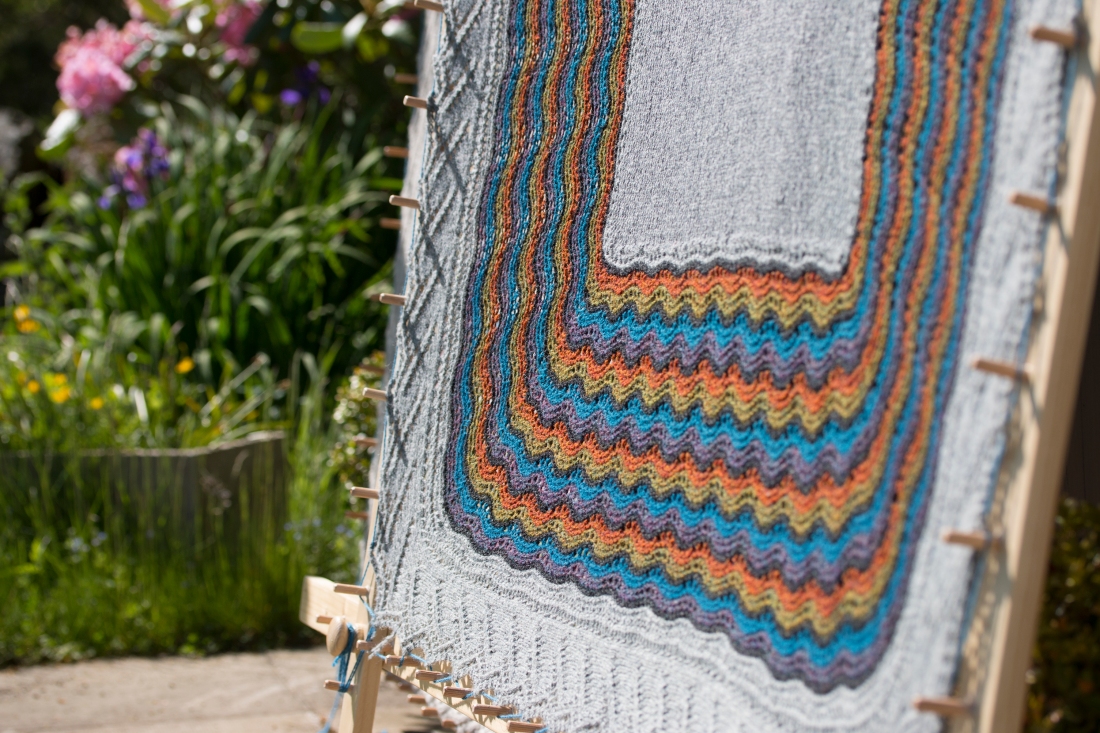
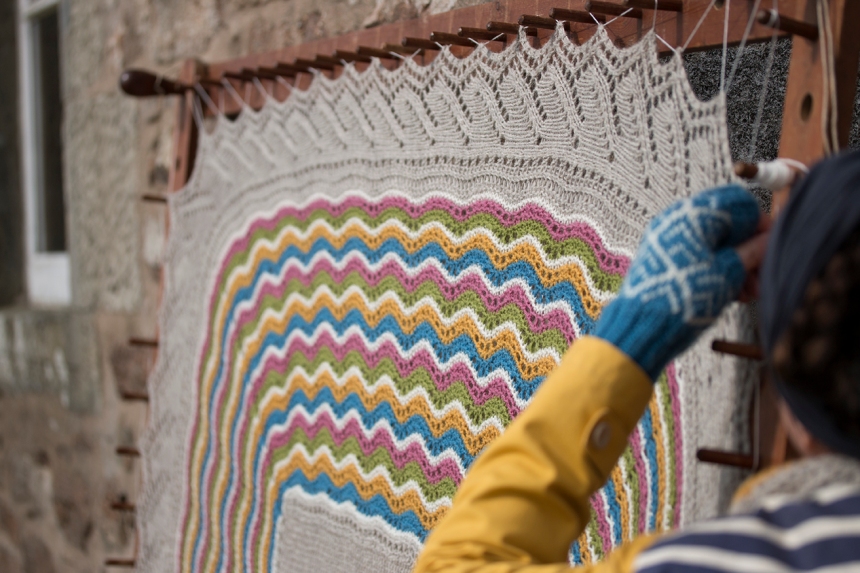
As you know, I photographed my Moder Dy design on a beautiful vintage hap stretcher that I borrowed from my friend Anne Eunson. In Shetland, such stretchers have been used for well over a century to block haps and shawls ready for sale, as well as for their knitters’ own domestic use.
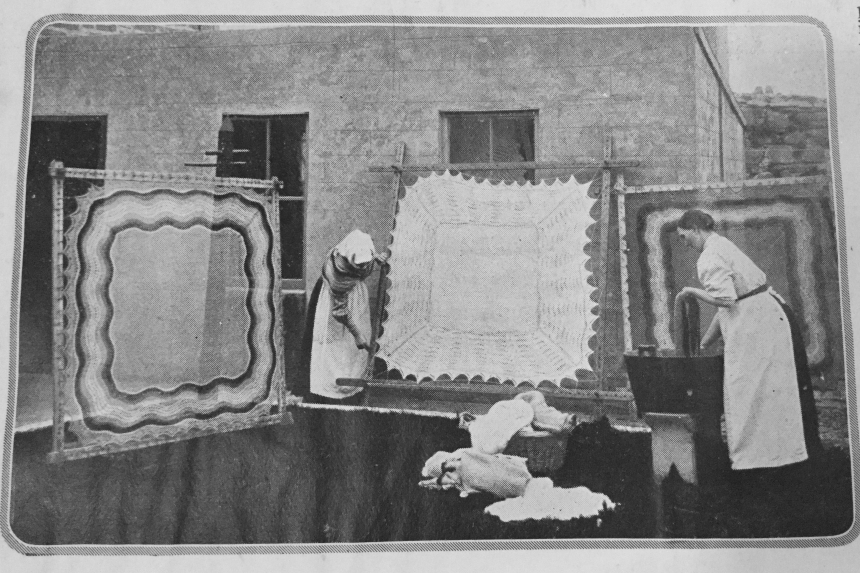
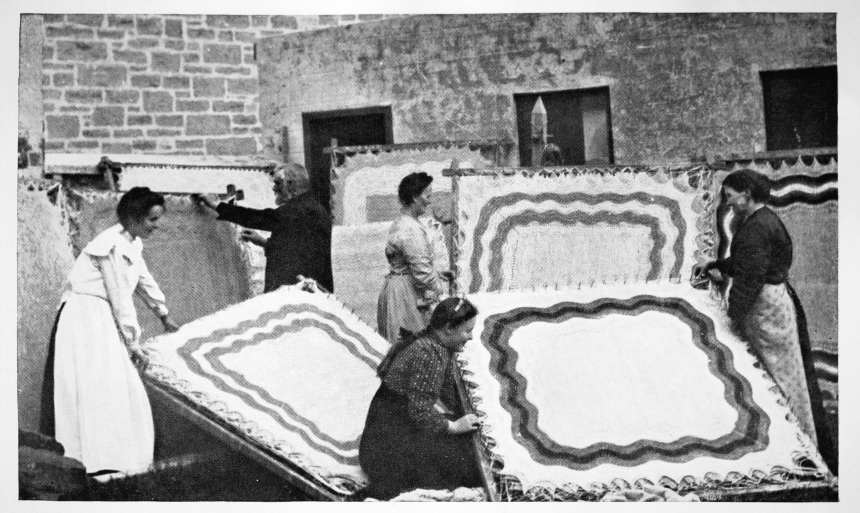
(washing and dressing Shetland haps in the early 1900s)
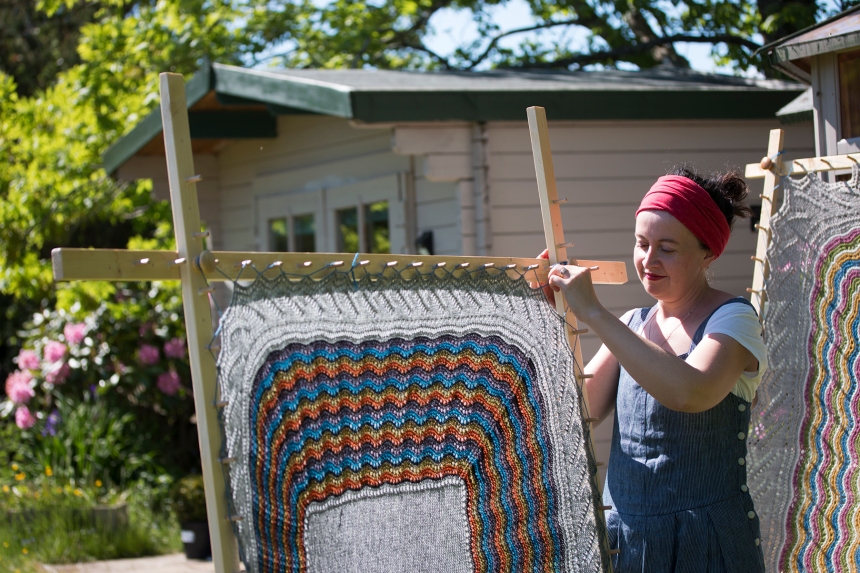
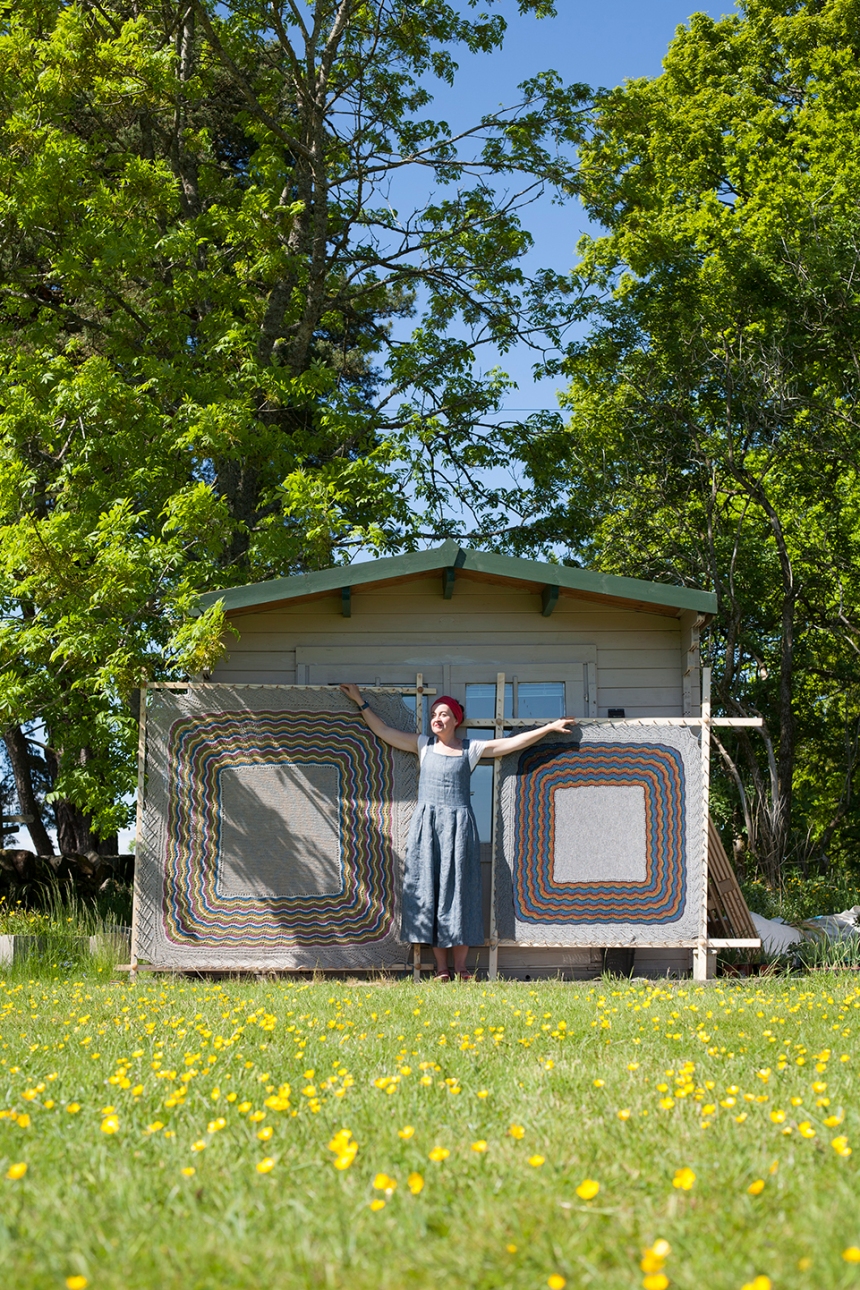
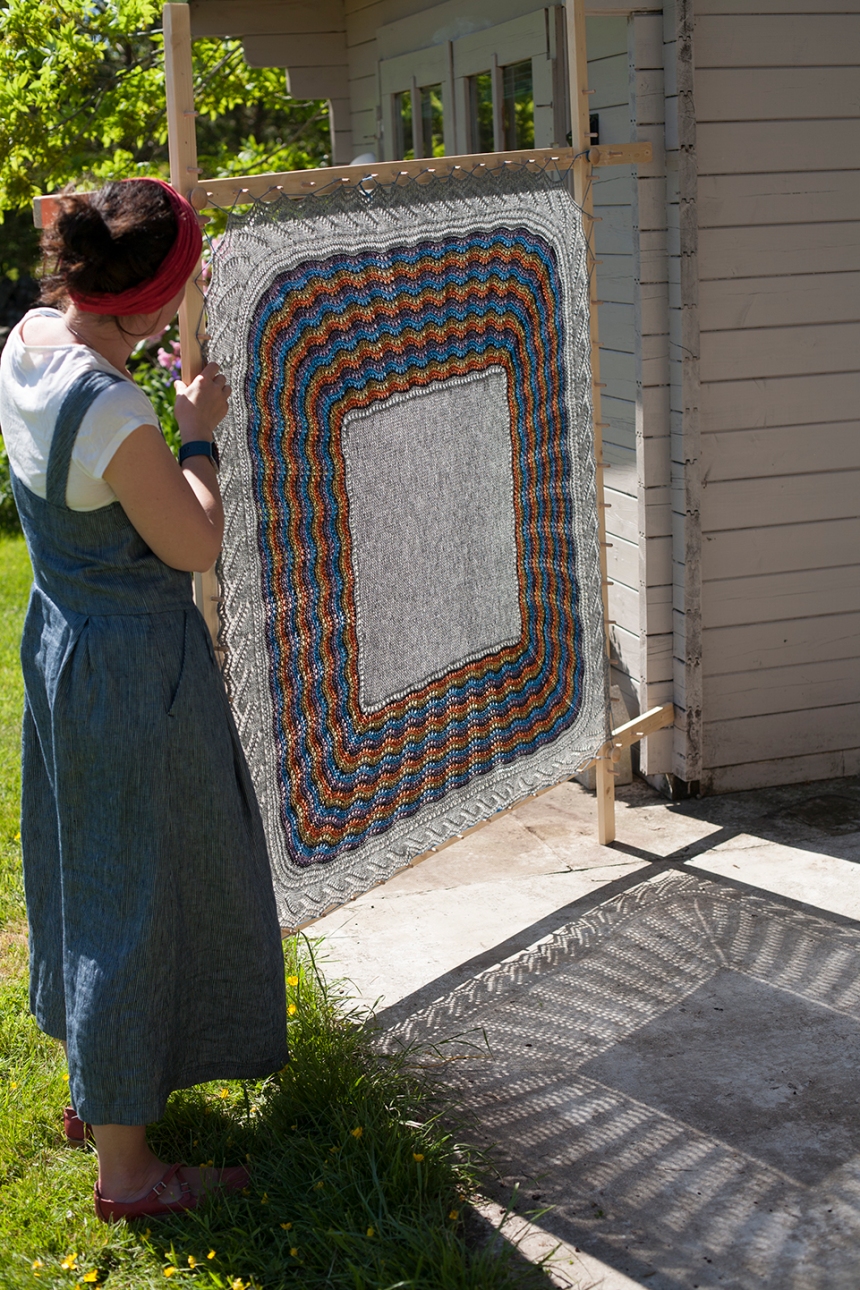
These stretchers are a really efficient way of stretching and shaping a hap or shawl. Strong yarn is threaded through each point of the lace edging, and this yarn is secured and tensioned over the dowels or hooks along each side of the stretcher. The hap is blocked to its required dimensions, and the finished fabric is beautifully even. In this image, you can see how each stretcher might be used to block several haps at once.
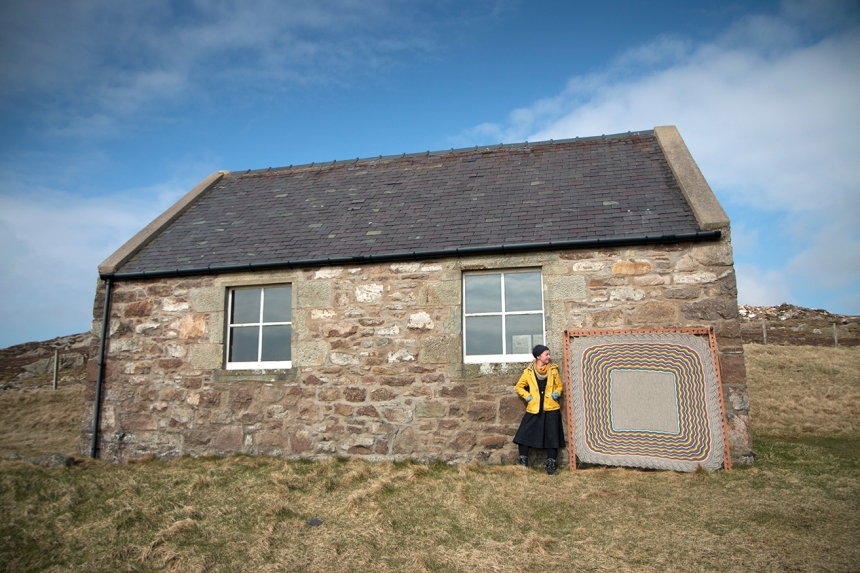
Shetland knitters knew what they were doing, and these stretchers are a brilliant (and very space efficient) way of blocking. In good weather, a hap-laden frame can be taken outside to dry vertically, and, after use, the frame deconstructs into its four component lengths, which might easily be stored under a bed. Also – I’ve not tried this, but I think these stretchers would also be a great way of blocking a triangular shawl, as well as a square hap. Lace points could be similarly strung up and drawn over the dowels, while a blocking wire might stabilise the long straight edge.
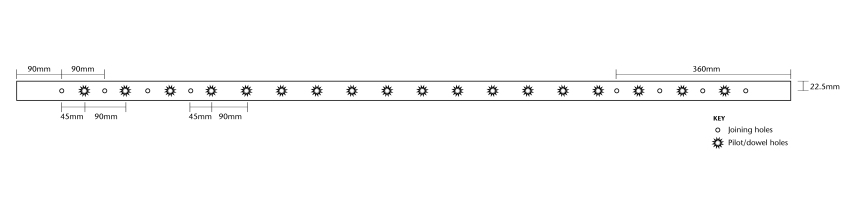
I recently asked Tom to build me a hap stretcher – which he kindly did – and he’s written up a tutorial for you here. The second hap you see in the photographs below is another Moder Dy sample that Mel recently knitted from Jamieson and Smith jumper weight. Simply adjusting the yarn-weight creates a much smaller hap! These instructions are for an adjustable hap stretcher, with a stretch area of 108cm x 108cm to 162cm x 162cm . If you want a larger (or smaller) stretch area, adjust the spacing of the joining points / holes outlined in steps 2. to 4.
Tom’s Hap stretcher tutorial

You will need:
Materials
4 lengths of timber (planed spruce, 18mm x 45mm x 1800mm)
72 wooden dowels (M8 x 40mm)
4 wooden ring handles (M4 x35mm)
4 machine screws (M4 x 50mm)
4 repair washers (M4 x19mm)
wood glue
varnish
sand paper (fine grade, 240 grit)
Equipment
sanding block or power sander
drill with 4mm and 8mm wood drill bits
tape measure or steel rule
pencil
set square (optional)
drill bit stop collar (optional)
dust mask (if using a power sander)
A HAP!
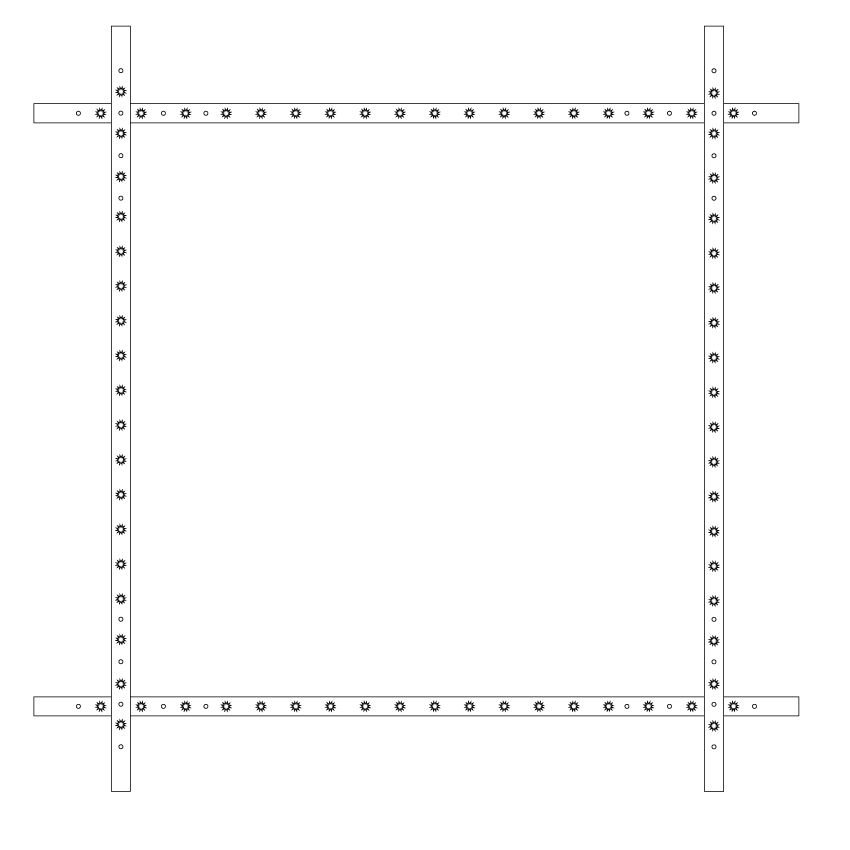
Schematic (click to enlarge)
Instructions
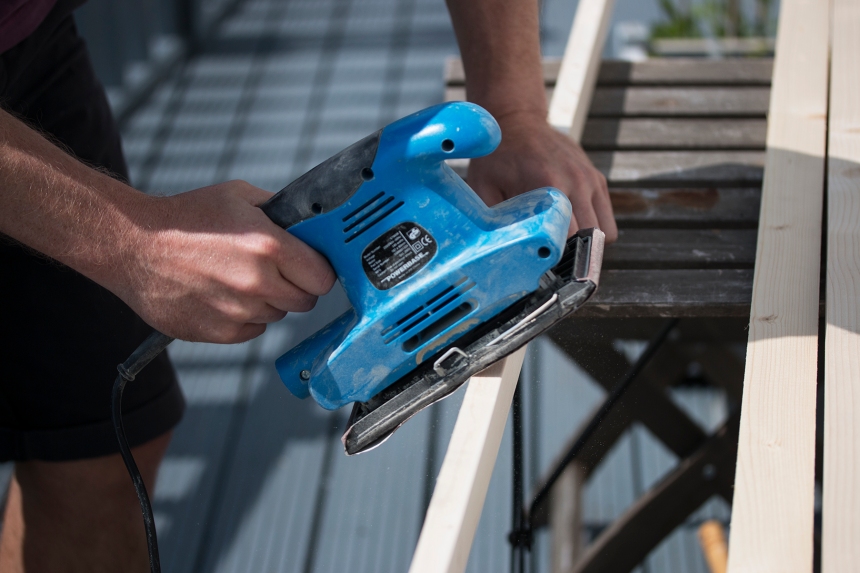
1. Sanding
Start by sanding the four lengths of timber until smooth (to ensure there are no rogue splinters which might damage your hap).
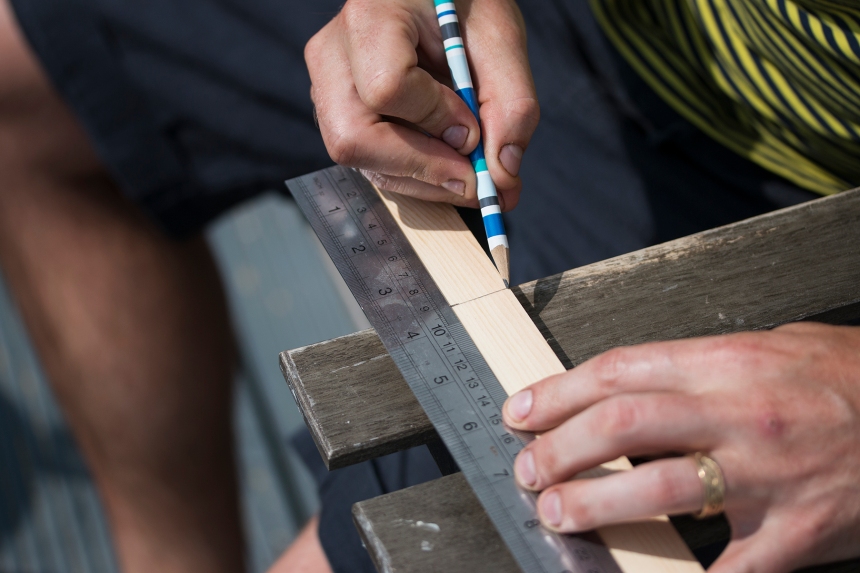
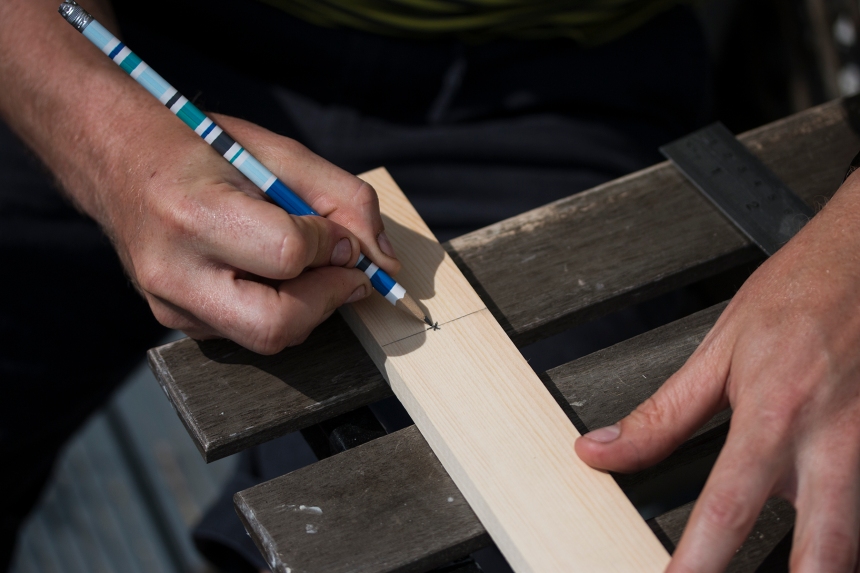
2. Draw joining holes
Using a steel rule, measure 90mm from the end of the timber and draw a vertical line lightly with the pencil. At the midpoint of this line (22.5mm) draw a cross. (This marks the first drill point for the joining holes which will be used to connect the 4 sections of the hap stretcher). Draw 3 further marks at 90mm intervals along the timber, until you have four marks.

3. Repeat
Repeat this process at the opposite end of the timber length, similarly making four marks at 90mm intervals, at the midpoint (22.5mm) of the timber.
Mark out these joining-hole positions on the other 3 lengths of timber in the same way.

4. Drill joining holes
Secure the timber on a sturdy table or worktop. Using a 4mm wood drill bit, drill through the timber completely, at each of the marks you have made (8 on each length of timber). Ensure the drill is perpendicular to the timber when drilling.
5. Draw pilot holes
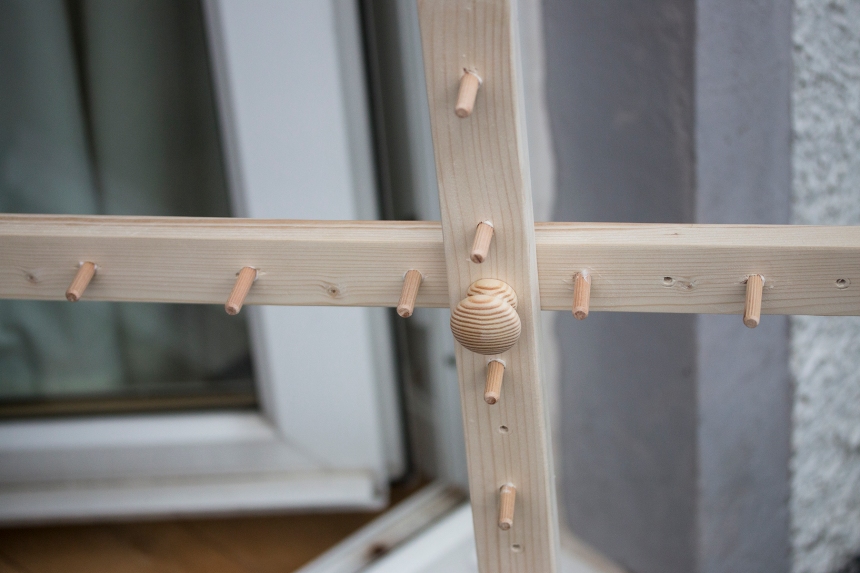
Using a steel rule, measure 45mm from the centre of the first joining hole (i.e. 135mm from the end of the timber) and draw a vertical line lightly with the pencil. At the midpoint of this line (22.5mm) draw a cross. (This marks the first drill point for the pilot holes into which wooden dowels will later be inserted). Draw 17 further marks at 90mm intervals along the timber, until you have 18 marks.
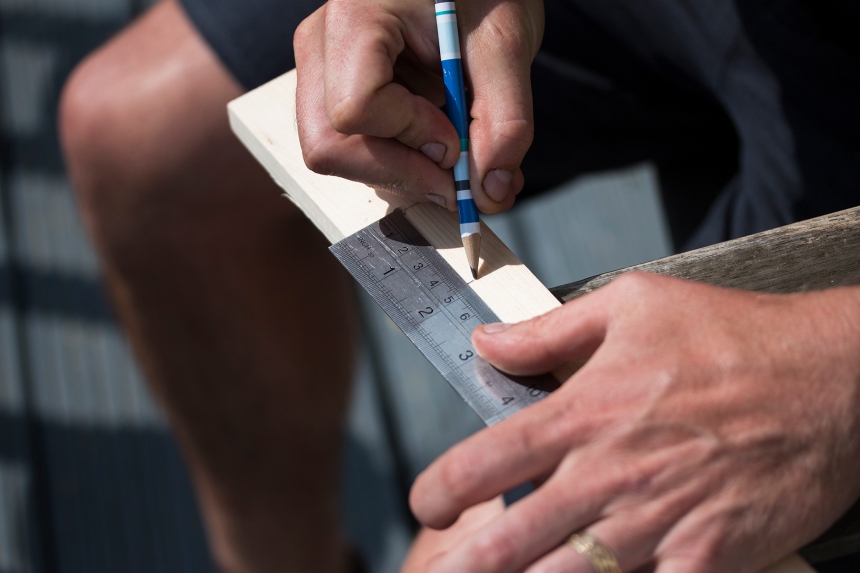
Repeat this process for the other 3 lengths of timber.
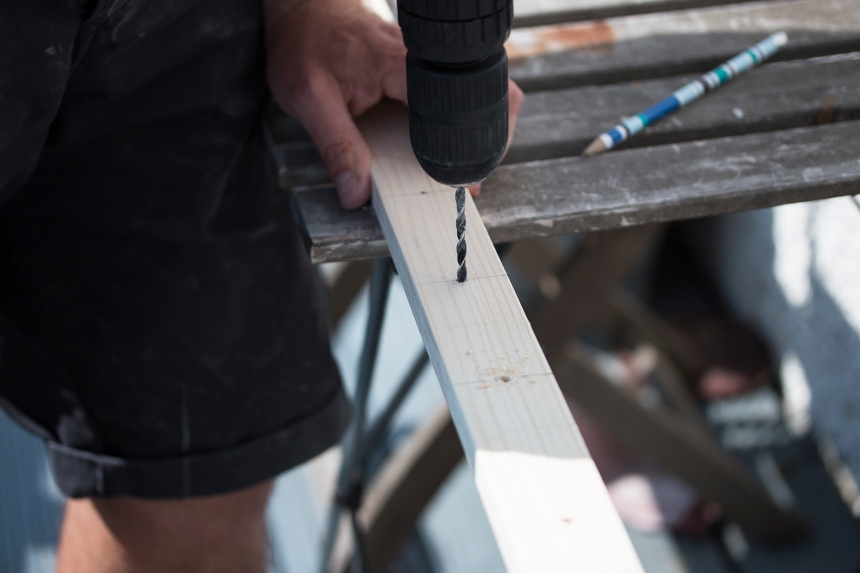
6. Drill pilot holes
Secure the timber on a sturdy table or worktop. Using a 4mm wood drill bit, drill a pilot hole 3-5mm deep. Do not drill through the timber completely. Ensure the drill is perpendicular to the timber when drilling.
Repeat for the other 3 lengths of timber. You will now have 72 pilot holes at 90mm intervals (18 in each length of timber).
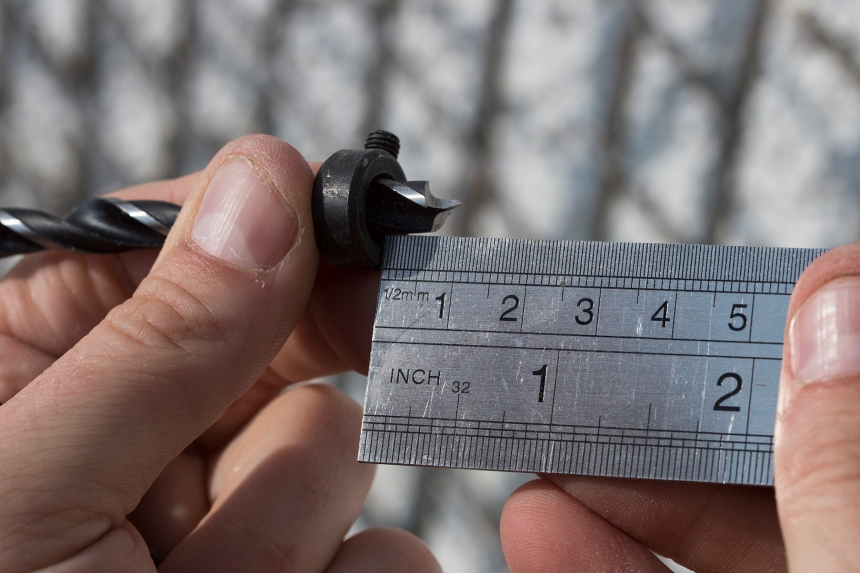
7. Fit stop collar
If you have one, fit a stop collar to an 8mm wood drill bit. The collar should be fitted 10mm from the end of the bit. If you don’t have a stop collar, yarn or wire wrapped around the drill bit can be used as a visual guide to prevent drilling completely through the timber. Wrap the wire clockwise around the drill to prevent unwinding.
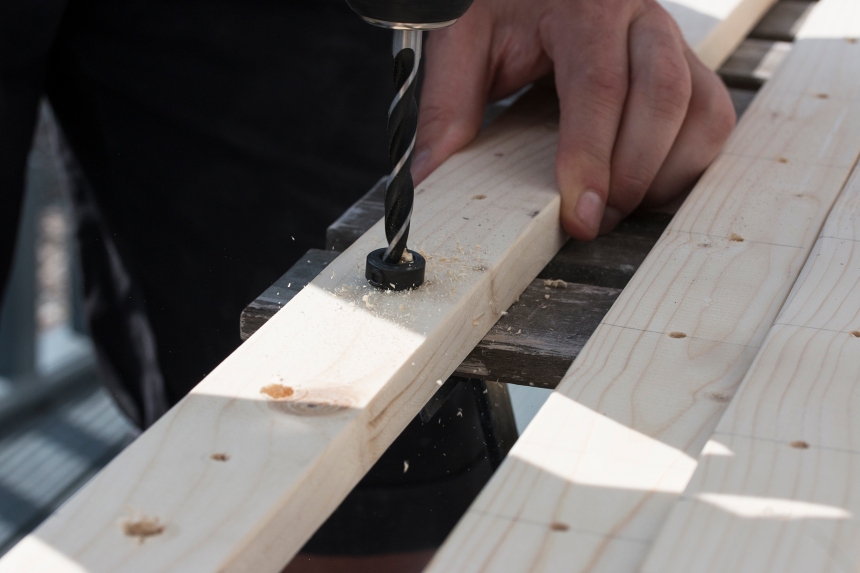
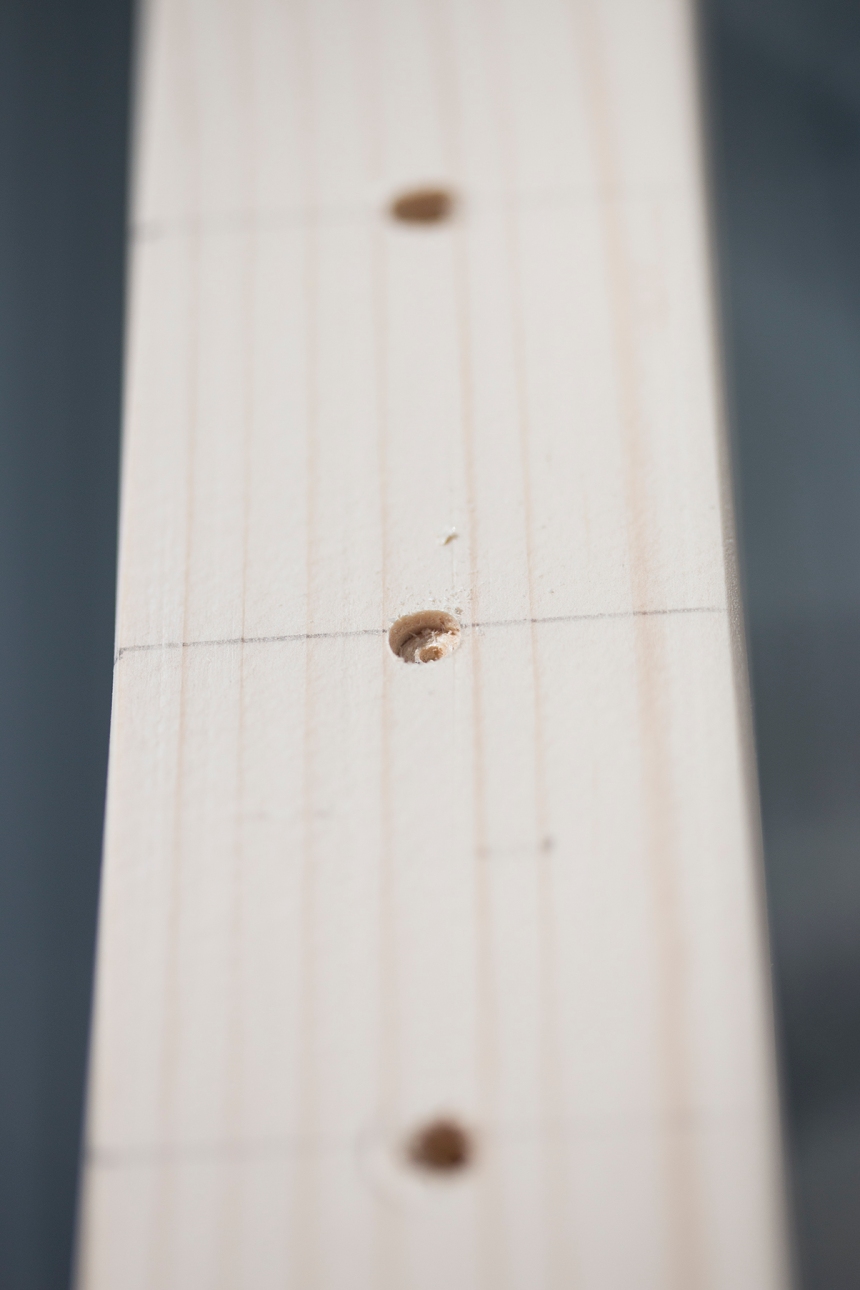
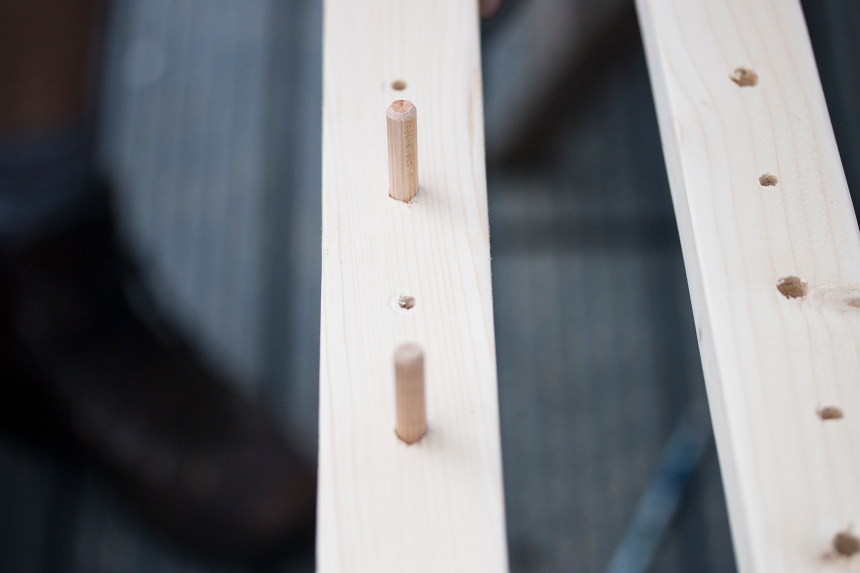
8. Drill dowel holes.
With the timber secured, drill each of the pilot holes with the 8mm drill bit to a depth of 10mm. Do not drill the 4 joining holes used for connecting timber lengths. Do not drill through the timber.
Repeat for the other 3 lengths of timber. You now have 18 dowel holes per timber length (72 total).
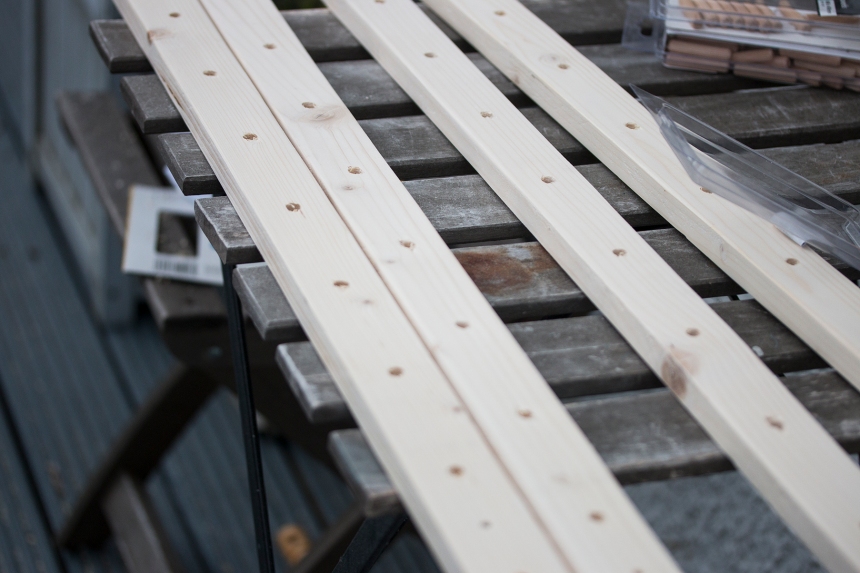
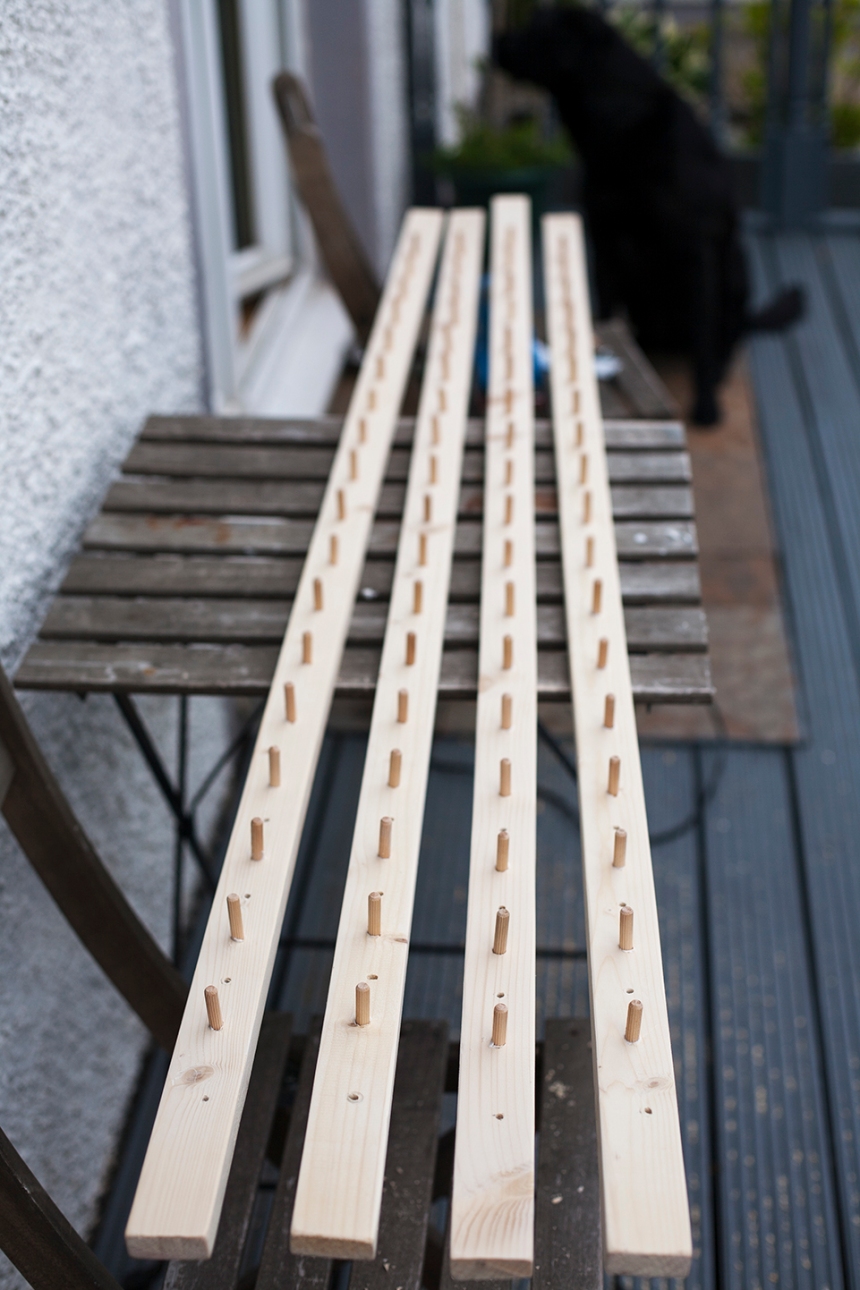
9. Sanding
Lightly sand the timber again to remove pencil marks and splinters from drill holes.
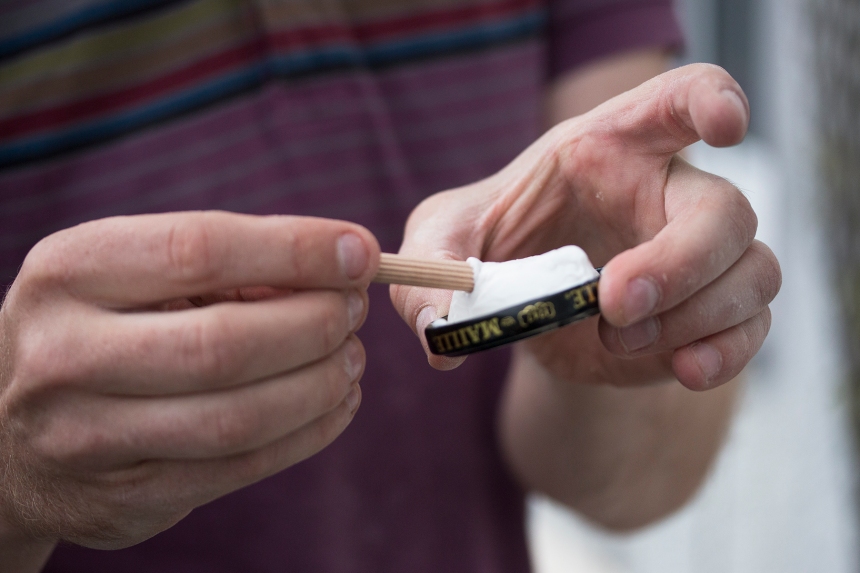
10. Glueing
Apply a small amount of wood glue to the end of a wooden dowel and insert it into the first dowel hole. Wipe away any excess glue.
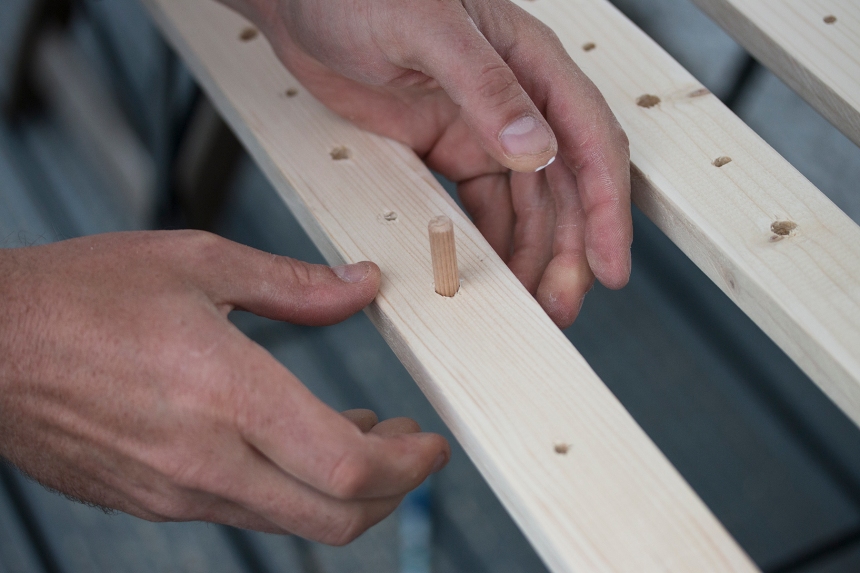
Repeat 71 times! Leave the glue to set overnight.
11. Varnishing
Apply varnish and leave to dry entirely.
12. Assembly
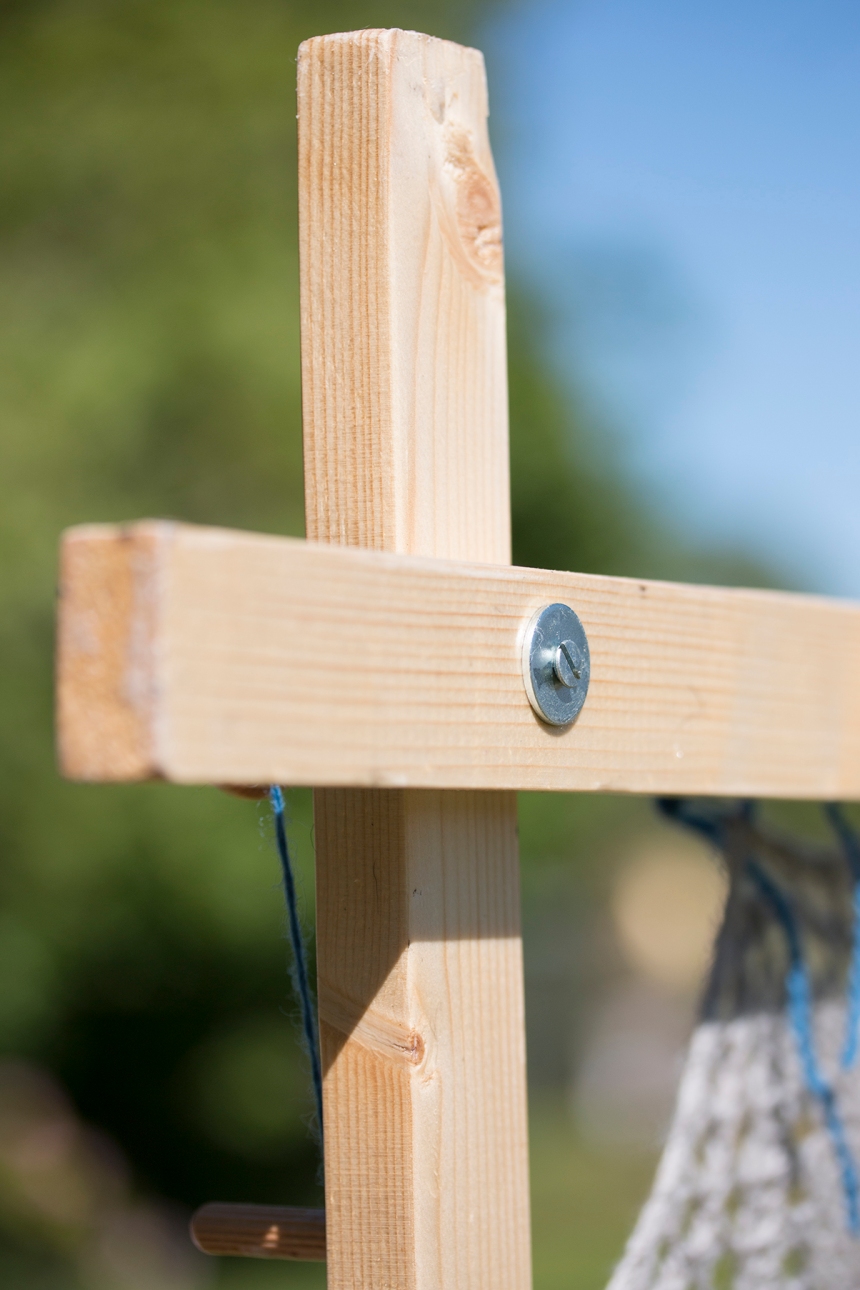
Put a machine screw through a washer at the back of the stretcher and screw on a wooden handle. Repeat at the other 3 corners ensuring the timber lengths do not cross (i.e. the top timber is behind the two side-lengths at both the top and bottom join of the square). Ensure the frame is square by placing against a wall then tighten the four handles.
13. Adjust the sizing, string up your hap, and pop it on your stretcher!
14. TA DA!
15. Use and enjoy your hap stretcher.
You will see more beautiful images of Shetland hap dressing in the Book of Haps!

Thank you sooo much! This is exactly what I need, and I think I could use it to take pictures of baby quilts as well 😊 – Best Wishes and have a wonderful day.
LikeLike
Hi! The last post I see was from early 2020 so I hope you see this!
I have just FINISHED my stretcher frame! Since I’m here in the US, I had to adjust some for “cm” and “mm” vs inches – but it’s worked out fine! It was so much fun, I may even approach my local yarn shop and see if they’re interested in special orders since no one in the US apparently uses them, everything is pinned onto foam squares, or, as in my case, the living room carpet! I would have to use a drill press, however, to make sure my holes are straight (having eye issues with no depth of field, and that really messes up your sense of perpendicularity!)
My NEXT issue, is there are NO instructions anywhere I can find for actually stringing a shawl – either square or triangular – on these frames. YouTube is sadly lacking in this area. So the next step will be a leap into the unknown, but I am still stepping off the cliff.
I have just booked a trip to the Knitting and Stitching Show in Harrogate this coming November, and am hoping to be able to extend that trip into Scotland when the show is over. I’ll even get to see some friends from the London area.
Thanks again for making this wondrous post!
LikeLiked by 2 people
Enjoy your stretcher, Gloria! Re: the stringing – loop the yarn through each point of the hap, begin with the corners, then the middle of each edge, then distribute the points evenly along the pegs.
LikeLike
Thanks so much for that
LikeLike
Since I don’t have a square shawl at this time to stretch – I tried a triangular. The first one had to go on the carpet because it didn’t have points, but this worked great! Thanks again! (See pics below)Â
LikeLike
I am so glad I found Tom’s excellent tutorial – thank you very much! I’m currently making a hap for special friends who are expecting their first child, and was hesitating to put a “pointy” edging on because of the blocking – they are not knitters, and even blocking a plain square of Shetland wool will be a new experience for them. Now I think I will build a hap stretcher and offer to wash and block their hap for them as needed (and as long as I am able), and then leave them the stretcher in my Will :)
LikeLike
with a stretcher, your beautiful edging will remain forever pointy!
LikeLike
Very clear instructions, thankyou.
I’ve just made one for my wife and she is delighted with it, saving around £100 for a bit of effort.
LikeLike
Thank you so much for the lovely clear instructions, Tom. I have a friend whose wood working husband has offered to make one for me as my husband is a thinker, not a doer! I have a question about a hap I’m knitting at the moment: it has wavy edges (old shale) and I really have no clue how to lace it onto the frame so do you have any advice, please? Thanks 😀
LikeLike
Oh my, I have been looking at this tutorial, off and on, for ages. And I have had the timber for quite a while. I’m nearly finished “restoring” a folding woolly horse!!! (Spotted by late dh in a charity shop!!! And, he knew instantly!!!! what it was. Sadly, it needed some TLC, which dh didn’t manage. But I’m pretty certain he’s overseeing what I’m doing!!) Yesterday – heat wave – what else would one do? I got out the timber for the stretcher.
Getting to the point!!! Is 90mm a critical measurement? Or was it just a convenient number compared with the overall length of the timber?
I’m going to try very hard to take my time, double and triple check everything, so I don’t make any mistakes – but, so used to working as a team with dh (even if I was the pencil holder/tea maker) I really miss his logical, common sense reasoning combined with thinking outside the box) …oops, rambling again.
So, my timber measures 178cm. If I put the first screw hole at 80 mm in, everything would be as per the tutorial measurements. But, playing with possible, I could re jig measurements slightly and end up with 20 legs at 80mm spacing.
Any thoughts, comments, suggestions would be greatly appreciated. Thanks
LikeLike
Cant thank you enough for sharing how to make the frame. I modified it slighly and love the results after stretching a shawl on it yesterday.
LikeLiked by 1 person
Hap stretcher for triangular shawls is easy. Buy an extra machine screw and knob, then use these to join 2 of the sides. By using 2 screws in adjoining holes the side will not bend but it may need to be square lashed together, ask a scout or look on the web for instructions.
LikeLiked by 1 person
Fabulous posting! Any chance you have similar instructions for making a folding woolly horse? The traditional folding design seems to have been replaced by that awkward non-folding design sold by Jamison & Smith and Lacis. I stalk eBay looking for an old used one, but have not had any luck.
LikeLiked by 1 person
Sadly not, Carolyn. If Tom ever makes one we will be sure to post a tutorial!
LikeLiked by 1 person
Thank you Tom for “unventing” this, as EZ would say…. I’ve been whining for quite a while now about how nobody has made a “blueprint” for a real stretcher.. There are some others around, but mostly garage-style made out of PVC pipe and such. I have the tools to do this myself, and so I will.
And thanks to you Kate for explaining how to actually mount it! And for everything else you do! You are such a fascinating writer and historian. I’m looking forward to your next book!
LikeLiked by 1 person
Technical information from my husband
Wire wool is the best thing to use for the final smoothing of the wood. I believe the correct type is available from builders merchants.
I learnt this from him when he revived my wooden cape pin after it had been dropped into water and had become roughly textured and was catching in the wool.
LikeLike
Fantastic. I am finishing a lace edging on my first square hap, but maybe I should make a stretcher first!
LikeLike
Thank you, Kate and Tom. I aspire to knit a hap worthy of such a stretcher.
Another question for Kate: the dress/pinafore you’re wearing looks wonderfully useful and comfortable. Where does it come from?
LikeLike
Lovely hap stretcher!
LikeLike
I was planning to ask for one of these for my birthday, but before I do, I have a question. What happens if your hap has more than 18 points per side? Thank you!
LikeLike
you can easily add more dowels, or spread the extra points out between the dowels. I’m just completing a hap which has 22 points per side and the stretcher will accommodate it no problem
LikeLike
Hi Kate just working on Somerled. Would you recommend making a slightly bigger frame with enough dowels for the 21 points on each side? I can’t quite see how I would fit 21 points on to 18 dowel!
LikeLike
Love it! Something else to add to the list of things for himself to make :)
LikeLike
Beautiful and useful! Thank you so very much!
LikeLike
Thanks so much Kate & Tom. My son is going to make it for me.
LikeLike
Thank you!!! thank you….!!! It is wonderful… I finished the Northwavine hap not long ago and my blocking is not something that I am very happy with!!!…ejem…. The book is just marvelous… reading the pdf files…love the haps history the pictures and everything. Really like your picture with the stretchers and all those yellow flowers…what a beautiful day!!
LikeLike
Awesome article and plans! Unfortunately it doesn’t come as a PDF. If you decide to do a PDF of this post, would you please let me know? Thanks so very much. Your articles and needlework are very informative!
LikeLike
The haps have arrived. – thank you. A lazy Saturday afternoon dipping between the haps and Liz Lochhead’s most tender new collection in which I find ‘A Cambric Shirt’.
He’d shelter her
Hap her weel-clad
In the cauld blast
In the cauld blast
His father-love
The camrie sark
Withoot ony seam or needlewark
LikeLike
Thinking out side the box here…. for a triangular hap, rather than trying to rig up something as a cross piece or stiff wire, could one not just use 3 of the 4 pieces of the stretcher and adjust it to be a triangle itself? Not being familiar with the flexibility of the stretcher, I’m not sure…. but in theory it should work…. yes?
LikeLike
Unfortunately, it wouldn’t. The four hap stretcher pieces are the same length, therefore using three would give an equilateral triangle. Triangular shawls are (usually) right-angled triangles – so you’d need to make a third piece the length of the ‘hypotenuse’ (the third, longest, side of the right-angled triangle) to fit.
Use partly forgotten school maths, YouTube, a pencil and paper, or laying out the pieces to work out the correct length, or even to see what I mean
LikeLike
Hmmm… I thought the hap stretcher had multiple holes along its length with which you could adjust the size. If not, you could always add more.
I can envision 2 possible ways to creating a triangle of varying degrees:
1) You could use the full length of one piece as the hypotenuse (using the holes on the very ends of that piece) and attach the 2 shorter sides to said ends. Criss-cross the other 2 pieces joining where needed to make the right (or obtuse) angle triangle, using holes farther along the other 2 pieces. Abstractly, this would be like adjusting the height of an ironing board’s legs. My only concern would be if the 2 “shorter” lengths could rotate enough along the hypotenuse, adjacent to the pegs, to be able to achieve the correct angle. Perhaps, temporarily removing a few pegs would allow for more flexibility of design?
2) Create you angle with two of the pieces and slide the hypotenuse piece along until it crosses the other two at the desired spot. Again, the angle may not be able to be achieved unless some pegs were removed.
I wish I could draw what I mean or send a picture of Popsicle sticks to demonstrate…. it’s very clear in my head…
LikeLike
Years ago I made a variation of this with PVC plastic pipe. Long straight lengths and 90 degree elbows to join. They don’t have pegs, I wrap the stretching yarn around the pipe. It disassembles to fit under a bed. No tools even needed if you can get the home center to cut the lengths you want. Just make sure you clean off the pipes first so the ink doesn’t transfer to your shawl.
LikeLike
That is almost exactly the same way the Senior Cat (aka my father) made mine many years ago. If knitters can find a tame woodworker it is well worth offering bribery and corruption (perhaps in the form of a wee hat?) to get them to make one.
LikeLike
Thank you for such an insightful article. My summer holiday knitting project is definitely going to be a hap, just so that I can make the beautiful frame! In a future post I wonder if you could give instructions on how to actually stretch the hap onto the frame! Do you attach opposite sides first or work you way round? I know, we are never satisfied with your inspiring posts, we always want more. But are always very grateful. Dioch!
LikeLike
Thank you Kate and Tom! I always look forward to your blog posts, to read research you’ve done and see the interesting things you and Tom are up to. Being from the USA, I love reading about the history of fiber and its use from other areas of the world. Thank you!!
LikeLike
My father had a (finished by) hand laundry business which included finishing/drying fine curtains and doilies. He had a similar frame that somehow had stiff wire pin tips all around it. Thank you for the fantastic tutorial – it’s so doable!
LikeLike
I wouldn’t have thought of putting more than one hap on it, very canny.
LikeLike
Apart from the making it bit, this looks fab and more effective than using a bed. I don’t have a tame man (or woman to speak of to make it unfortunately) so would have to get to grips with carpentry tools (how are you meant to know that the drill has gone in 10mm for instance?) and have dodgy wrists too or get a joiner to do it for me. I tried to locate hap boards online and failed to find one. My guess is you’d have to hunt one down on Shetland or Orkney. Thanks, Tom. I assume this isn’t in the book, Kate? To answer one of the posts below though I guess you could put triangular shawls on it too with a bit of thought and perseverance.
LikeLike
Dear Kate,
simply wonderful!
Is there a possibility to block a triangle-shaped hap, too?
Greetings from Northern-Germany
LikeLike
Tom did a great job with the tutorial. Very clear & easy to follow even if you have no carpentry experience. Also loved seeing Mel’s smaller hap. While your hap is beautiful, Kate, some of us may not need something quite so large. Can you tell us how much yarn was used in Mel’s hap, please?
LikeLike
that is awesome!! thanks for sharing!
LikeLike
Thank you and Tom for the terrific hap stretcher! I’ll be adding this to the “honey do” list.
I see that Tom is in shorts, weather must have finally warmed up.
LikeLike
I’m impressed. 😃😃
LikeLike
Love that you can block/dry vertically outside, bet it goes much quicker than on top of a bed inside (plus you get your bed back). I guess I didn’t realize how large your haps are, you’re basically knitting a blanket. To wear!
LikeLike
Excellent photographer and woodworker too?
(I think you scored, Kate. Better keep him around!)
As always, an interesting blog post!
LikeLike
Your timing is excellent Kate and Tom. Thank you. I will be making one a double sized frame. Not for a Hap but for a full square lace shawl. I might need bigger timber. Otherwise it might stretch inwards.
LikeLike
Kate, Thank you, thank you, THANK YOU for sharing the tutorial! Tom, you are a genius!
LikeLike
Brilliant post. Thank you very much. Tom & Kate! :))
LikeLike
Thank you so much, Tom, for this excellent tutorial. I may just know someone who would be willing to make a stretcher for me, given such good instructions.
And thanks to you both for the Haps book, which is probably winging its way to me as I write. I do look forward to it!
LikeLike
This is awesome!!! Thank you!!! This seems like the absolute best way to go. How generous of you and Tom to share this design with the community of Shetland shawl lovers!
LikeLike
I need one of these!
LikeLike
That is brilliant! Thank you. I have someone lined up already to make one and wouldn’t you know, he just had a hip replacement on Monday haha what an excuse! It will get done. Cheers.
LikeLike
he can do most of it sitting down!!!
LikeLike
You need a hap replacement
LikeLike
Fantastic tute! TY
LikeLike
What fun! Thank you both.
LikeLike
This was such a helpful and generous post, Kate and Tom! Thank you both very much. I’m wondering if my warping board can double as a hap stretcher… Off to measure it, now. Cheers!
LikeLike
I can see Tom being swamped in orders, and ending up in business …
LikeLike
I’ll bet there would be a way to secure a removable cross-piece for doing triangle shawls. My blocking wires were too short for the last triangle I blocked. I think the straight edge of a triangle shawl could be stitched closely onto a dowel with an overcast stitch and then attached to the hap board at the correct angle.
LikeLike
Another great post and thanks to both of you for sharing your awesome talents.
LikeLike
Thank you both so much for this! Extra bonus points to Tom. 😄 Off to make lumberyard shopping list now!
LikeLike
Fascinating!!
LikeLike
I now have a newly discovered need for an hap stretcher.
LikeLike
Now we can all make one for ourselves. Thanks so much!!!!
LikeLike
Love it! Many thanks to Tom~
LikeLike
Un grand MERCI Kate !!
LikeLike
Thank you for posting the tutorial. What a lovely day you had for the photos and for drying the haps! My best to you, Tom, and Bruce.
LikeLike
Such clear instructions, I think I can manage that (even the “repeat 71 times” bit…!). Thank you both for taking the trouble.
LikeLike
Thank you Kate and Tom! I have just finished my first hap (Hansel, by Gudrun Johnson) and must now make a hap stretcher so that it can be blocked properly. The patterns in your new book are absolutely beautiful, and I’m eagerly anticipating starting the next hap.
LikeLike
Thank you both for that. I remember blocking a lace christening shawl that a friend had knitted. We pushed back her sofa, spread it out on her living room floor and pinned it – then she went away on holiday, leaving it to dry. So much simpler to have a frame!
LikeLike
Thank you to you both for taking the time to do this tutorial. It looks like an essential piece of kit for any serious hap knitter as well as a thing of beauty in itself. Am off to get hubby in a good mood so we can go shopping for timber!
Regards Jane
LikeLike
Thank you for show the istriction!
LikeLike
Thanks for sharing Tom and Kate, looks foolproof! I will make one for sure
LikeLike
ho ho ho, what a so kind Tom you have :-)
thanks very much for the tuto.
I’ll try to ask my husband to build me one.
LikeLike
Thank you!!!
LikeLike
What a lovely shadow in that last photo!
LikeLike
How wonderful! Thanks for sharing your knowledge and talents! (And Tom’s, too!)
LikeLike
how brilliant is that!!!!
LikeLike