
I can’t believe we are in the ninth week of the Inspired by Islay club! I’ve spent such a long time with these designs, and the thoughts about these designs, and it is very satisfying to finally send them out into the world. One of the things I rather miss is writing more about process. It is sometimes difficult to discuss one’s thinking about a design without spoiling the surprise, and believe me, there is a lot of trial and error going on here behind the scenes! As today’s club design – the Ardmore gansey – is one which involved a few interesting decisions, I thought you might like to hear more about the process behind it. (Those who are not fascinated by sleeve-caps can stop reading now!)
I’ve often been drawn toward designing and knitting a gansey with a maritime, masculine feel, and some of my favourite ganseys are the simplest: those with a plain body and a small amount of textured patterning around the upper torso.

As well as poring over photographs, I’ve taken lots of inspiration from the books on my shelf. I’ve long loved Glady’s Thompson’s writing, and her classic book on ganseys is one of my all-time favourite knitting titles. Stella Ruhe’s work on Dutch ganseys includes important research, and is also well-worth a look. As well as allowing you to find out more about the history of this important working garment, Ruhe and Thompson’s books teach you a lot about fit and shaping, and the “traditional” combination of a drop sleeve and under-arm gusset.
(image from Interweave).
Though these underarm gussets were probably essential for close-fitting nineteenth-century garments that required general ease of movement and saw an awful lot of wear, I tend to feel that far too much fabric is created by them at the underarm. I wanted my gansey to have a fit around the sleeve that was more modern and comfortable, and a little more refined.

Ever since I saw my friend Gudrun Johnston’s classic Audrey in Unst design, I’ve enjoyed designing garments with top-down set-in sleeves (if someone (apart from Barbara Walker) pioneered this interesting construction in a contemporary pattern prior to Gudrun I’m unaware of it). Some of my favourite cardigans feature top-down set-in sleeves, such as Ursula and Deco.
 (Ursula)
Over the years, I’ve mused long and hard on these sleeve caps, and have modified the way I design them several times. To my mind, there are two basic impediments to a top-down set-in sleeve that fits well around the upper arm: the first is gauge differences (a frequent issue when working small circumferences is that knitters’ gauge differs wildly from their ‘achieved’ gauge used throughout the rest of the garment – and by the time the sleeves are being worked these gauge differences go unnoticed.) The second impediment is what I’ve always felt was a little excess fabric at the underarms and upper arms. I’ve found this tricky to address, and I’ve previously done so by working the sleeve caps on smaller needles, then decreasing away any excess fabric through the sleeve. But for my neatly-fitting modern gansey I was determined to solve the conundrum once and for all and come up with what was (for me at least) the ultimate top-down sleeve cap! So I did quite a bit of research. I examined stitch ratios, geometry and proportions in the patterns of several other designers, and carefully read Elizabeth Doherty’s excellent book Top Down: Reimagining Set-in Sleeve Design. Books and patterns gave me lots to think about, but the simple fitting method I’ve devised here is my own – please feel free to follow and adapt it.
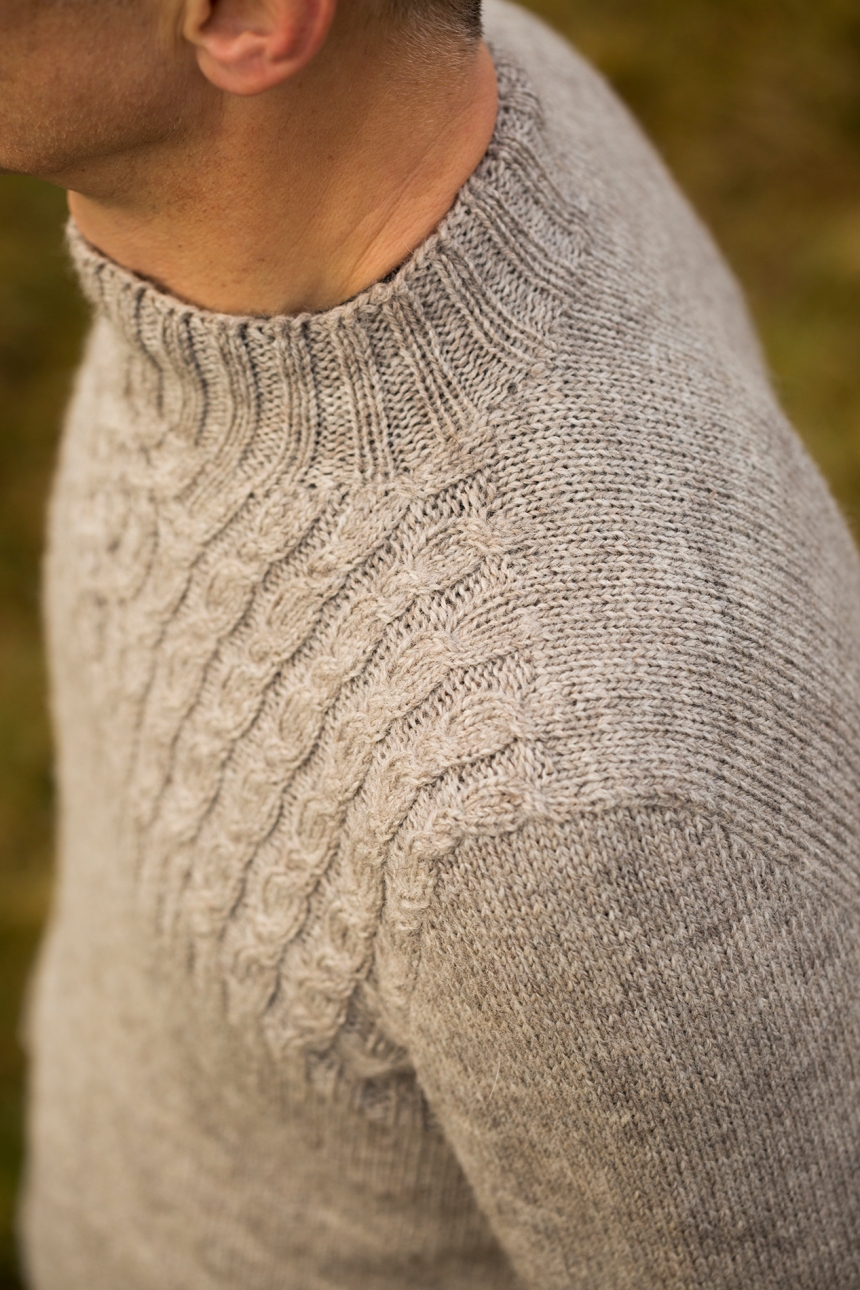
There are two key elements to my method: the first is to relate the number of stitches picked up around the armscye to the desired finished circumference of the sleeve at the upper arm. This results in far fewer picked-up stitches than you would imagine – a ratio of around 1 in 2. Second, repeated swatching suggested it was necessary to only work the short rows down half the depth of the scye (i.e. half the stitches remaining after the widths of upper shoulder and underarm have been factored out).
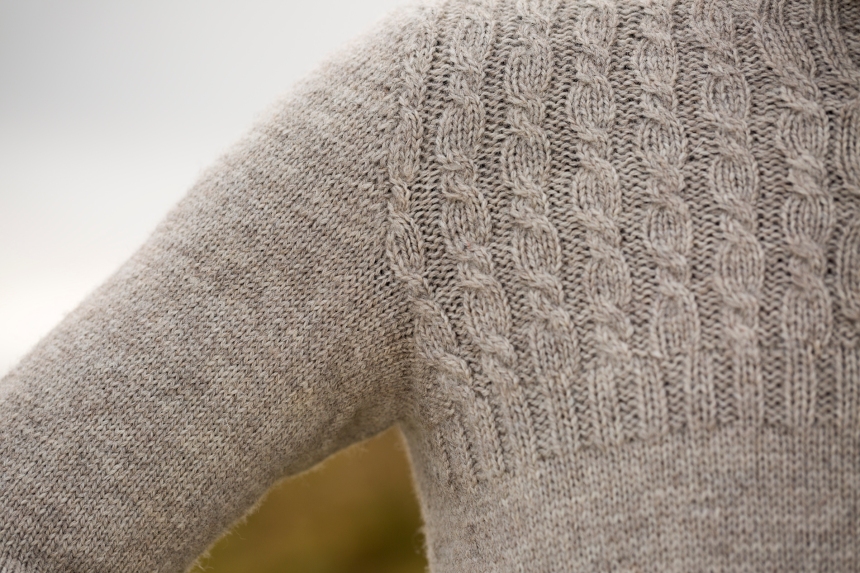
This photograph shows the transition between short row shaping, and the point where the sleeve has been joined to work in the round. Some may perhaps question whether this sleeve cap is in fact set-in at all. In fact, it is effectively a combination of set-in and drop, with only the shoulder and upper arm being accommodated by the short row shaping.

But whatever you want to call it, the result is a sleeve cap which is completely seamless, fits really well, and doesn’t have a problem of excess fabric around the upper arm. (I liked my new method of sleeve construction so much I also used it on the Kildalton cardigan.)

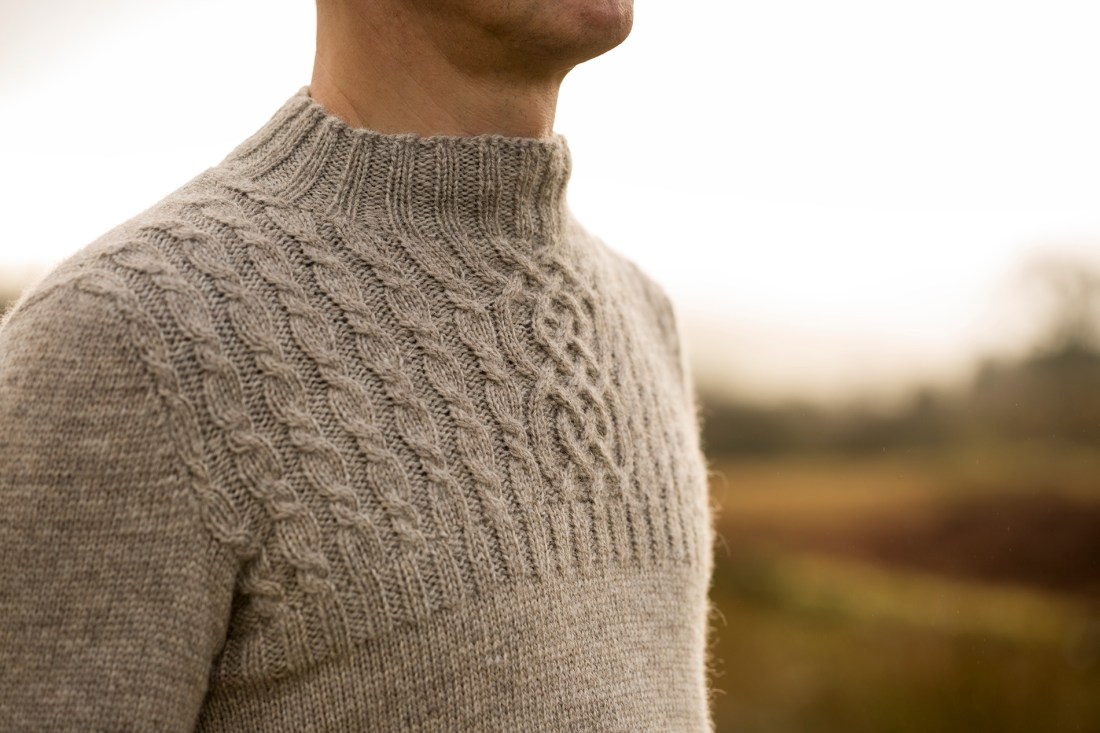
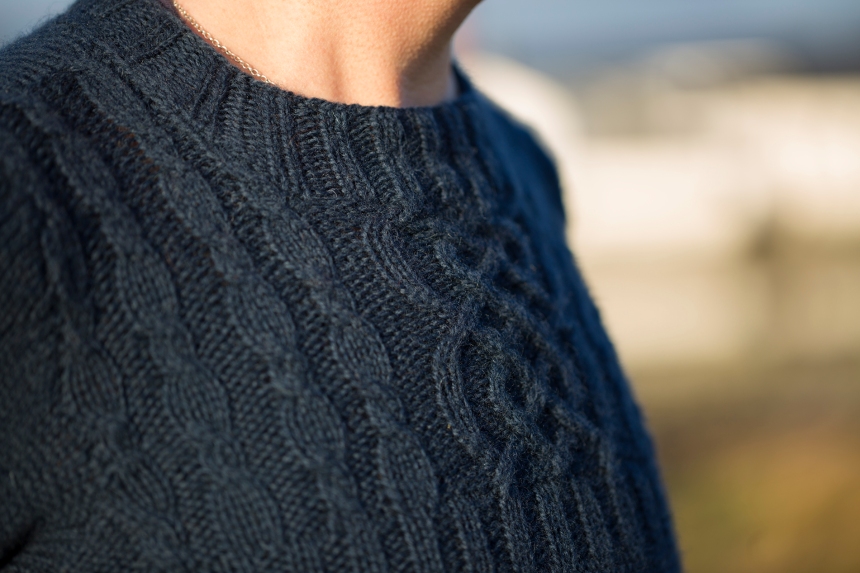
Another design conundrum posed by my gansey idea was the fact that the majority of the garment was worked in plain stockinette, with a single section of cabling around the front of the upper torso.

If you’ve never designed a garment in a combination of stockinette and cables, you may not realise this a problem: the issue is the radically narrowing effect of the cables in comparison to the plain fabric that surrounds it. I might have specified going up a needle size (or two) to work the front panel but the effects of such a move on an individual knitter’s gauge can be incredibly variable, and I felt it was too blunt an instrument in this case (a decision which my tech-editing guru, Jen Arnall-Culliford eagerly encouraged). Repeated swatching is always the designer’s friend, and in this case it allowed me and Jen to accurately verify the stitch differential between the cable panel and plain stockinette sections.

To divide stockinette from cables, a section of 2×2 rib is worked, followed by a series of increases which allows the panel to be worked at exactly the same gauge as that which preceded it. Those who like their cables to “flow” out of their ribbing may be offended by this move: I swatched other transitions (moss stitch and garter stitch) but in the end much preferred the rib, despite the fact that the increase row effectively means that the cables cannot “flow”.

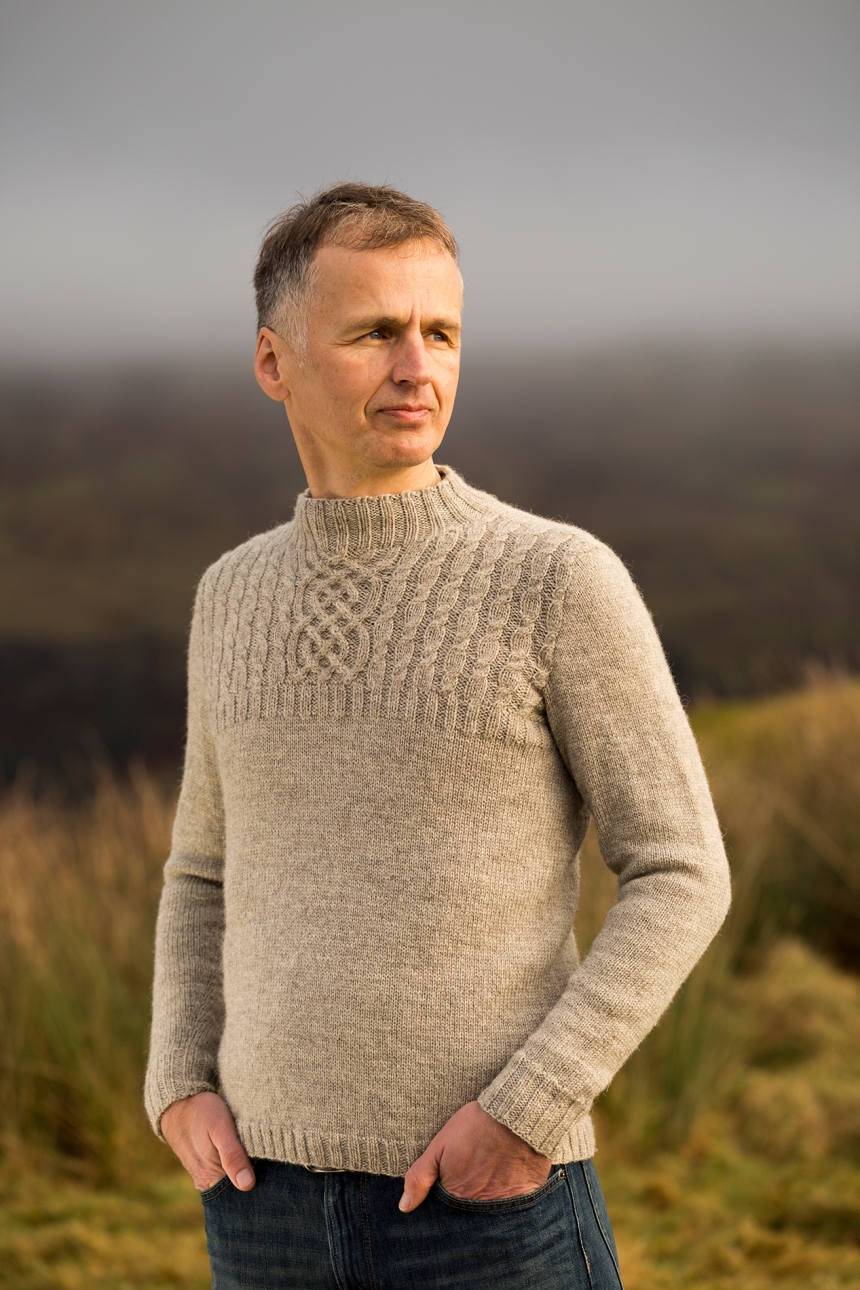
Finally, a note on fit. This pattern has a wide size range (to fit chests from 30 to 60 ins). My friend Gordon is wearing his gansey in the 7th size with slight positive ease. I also knit one for myself, in the second size, with zero ease.
Gordon is well over 6 ft tall, while I am just over 5 ft. The pattern is very easy to adjust in terms of sleeve and body length for different requirements, and you may wish (as I did here) to add a little waist shaping and to work fewer rounds of rib at the neck than specified.

The gansey has been designed to suit the shape and proportions of a masculine torso, and, being the complete opposite of well-endowed, it rather suits me. The design and grading of the armscyes and upper body reflects this masculine fit, which can be worn with more ease than either of the garments shown here (for a looser fit, select a size up to 2.5 inches above your actual chest measurement). There’s lots of information in the pattern’s sizing table to help you make adjustments to suit your gansey’s intended wearer.

I hope you’ve enjoyed reading about the design process behind the Ardmore Gansey!
If you are interested in joining the Inspired by Islay club, and receiving the nine already-issued patterns as well as the three to come, you can still do so here.

I love this pattern and I thought it was serendipity that on Countryfile yesterday there was an item on Gansey/Guernsey from Filey.
Perhaps this should be your next book: Gansey from around Britain.
LikeLike
Love the gansey! Modern with a beautiful old fashioned touch. Your explanation of the sleeve treatment was terrific. Thank you for sharing your knowledge with all of us!
LikeLike
Audrey in Unst is to be recommended (knitted it three times as it is my ‘Go To’ cardie and regularly adapt other patters to use her sleeve cap method). The pattern is very well written and knits up beautifully. Thank you for crediting her.
LikeLike
I do SO much enjoy reading this type of post, Kate. It leaves me quite in awe, I must say, at the (for me anyway) mind-boggling processes behind knitwear design. It makes me all the more appreciative of your talent, and as always, amazed at your prolificacy. You must be very disciplined and organised in your approach. I’d love to hear more about how you work, keep this kind of post coming, please! (Stunningly beautiful gansey, beautifully photographed as usual, too.) xx
LikeLiked by 2 people
I really like this gansey, and it looks equally nice on men and women. I find a high armscye allows for more mobility, for example when raising arms above head. Don’t know if this sounds weird, but at first I was unsettled by the 2×2 rib transition leading in to the cables, but after looking at the garment a number of times I now find it quite appealing! I am really eager to try your newly engineered set-in sleeve cap. It’s beautiful to behold.
LikeLike
As the wife of a very skinny man, I really appreciate your choice to model this on a slender chap – it helps so much to be able to visualise the fit. My husband is very keen on this design, so it may be the first Inspired by Islay design I cast on – hopefully not the last. But I have a question about the durability of the seamless shoulders/armscyes. Am very impressed by the neatness of the fit you have achieved and I prefer to knit top-down sleeve heads than to sew flat pieces, but I thought one of the arguments for seamed construction was that it was stronger. And men (or my man, anyway) seem to have an astonishing ability to shred jumpers at the underarm (do not ask me how he does it!) Have you any thoughts about this as a designer? I’d be delighted to hear counter-evidence – perhaps seamless knitted fabric is stretchier and hence more resistant to rips? Or do we just have to teach our husbands to take off their jumpers more gently?!
LikeLike
I second this excellent question! I too prefer seamless knitting, and I hope Kate has the chance to respond more fully about the durability of seamed versus seamless construction. Many thanks!
LikeLiked by 1 person
please contact us for a refund.
LikeLike
Very interested to see you have included cables either side of the central panel rather than doing a knit/purl pattern,
LikeLike
Thank you for your beautiful design and explanation of how you came to your chosen method of sleeve cap shaping. I do love an elegant, top-down, set-in sleeve. Have you read Andi Satterlund’s “A Guide To Seamless Set-In Sleeve Sweaters”? I believe she came to much the same conclusion you did: she advises picking up stitches by a 1 in 2 ratio, and works short rows to the top of underarm shaping. It produces a very elegant sleeve cap.
LikeLike
Thank you for your technical detail here, I too am a disliker of the extra fabric at the set in sleeve.
I learn by reading instructions, so the more chatty detail the better! Also, I am fascinated with the design process and enjoy seeing your process. After knitting an item I can say ‘So that’s it! That’s how they thought as they constructed this’. Knitting something is like following in the footsteps of the designer, and I really love it as a concept.
Hopefully you have the holy grail here, and this technique can be used from all set in sleeves from now on!
LikeLike
PS: I love the fit of your garments: but are they sized for wearing, say, a shirt underneath? Or should I go up a size?
LikeLike
Thank you for your incredible detail in designing and explaining all of this. Being a big picture person, I so appreciate when others can fill in details I would never even think of. This could not have come at a more perfect time.
LikeLike
Delicious detai, thanks Kate.
LikeLike
Love all your patterns including this one……thank you for the link to Jen Arnall-Culliford after droooling on Ravalry I bought six of her patterns. Just need to get past my newby state knitting wise to be able to knit your & her patterns……….Deborah x
LikeLike
Oh Kate I just gasped when I saw this beautiful design! My 30 yr old son will look so handsome in this! I ran over and joined your club and just love your designs! Thank you so much for all your work on presenting us with these lovely designs to knit and enjoy!!
LikeLike
Oh I Kate I gasped when I saw this beautiful design! My 30 yr old son will look so handsome in this!! I ran over and joined the club! I am such a big fan of your designs! Thank you so much for all your work on these for us knitters to enjoy!!
LikeLike
Love the look of this and intrigued by the construction. As I just knit for myself and am male, I’m wondering if the pattern will be availalsl separately at some point…?
LikeLike
I too am glad of the technical notes! Thank you. As garments become more and more fitted near the armpit, I enjoy having detailed notes with which to undo some of the fittedness. My shoulders are knobby and broad, yet my torso looks much like Kate’s in the photo otherwise. I must go up several garment sizes just to get my shoulders in. It’s physics–I don’t think that designing for myself from scratch would be much better.
I don’t know how the timing compares to the release of Audrey in Unst, but several designers based in Germany and France have used SusieM’s contiguous method to good effect. A free-to-download example is Coquelicot. Perhaps separately, perhaps not, Åsa Tricosa’s ziggurat method acknowledges Tuulia’s tailored sweater method, which like Audrey is dated 2009.
LikeLike
Absolutely elegant in it’s deceptive “simplicity” (not). These are fitted so well that it almost looks like they were poured on as a comfortable outer skin. I love your original take on the gansey detailing! And I’d never have pictured it in dark blue, but I like it very much in that color! Both colors are so nautical!
LikeLiked by 1 person
Thanks very much for the process notes! I find this kind of thing super interesting, especially since the sweater I’m knitting now has this kind of sleeve. I tried a few different things, and mine isn’t perfect but I learned a lot. I really appreciate being able to benefit from your research and swatching. My next sleeves will be better thanks to this!
LikeLike
Oh, this is just scrumptious! I want to knit every single one of these designs, but the sleeves and upper body of this design are especially intriguing for me. I am also the opposite of well endowed and even shorter than you, Kate (just under 5 feet) so I think this one will be ideal for me!
LikeLike
Thank you! i quite enjoyed that. I normally stick with raglans and round yoke because I’ve never been able to get set-in sleeves to work well for me (i have a big bust, but narrow shoulders – so if I knit the garment to fit my bust, it’s almost always too big in the shoulders). But I’ve knit a couple of Andi Satterland patterns recently and she does the top-down set-in sleeve as well. Its very interesting to read your take on them. I’ve been contemplating my own design with them, so I love to pick up knowledge from other designers.
LikeLike
Oh, I love this! And my man is well over 6′, so it’s nice to see how well this fits a Mr. Tall. I’ve not yet had the courage to knit a sweater for him. This may be the one.
LikeLike
lovely design and I very much appreciate hearing more about your design process. I am going to scour your pattern for more info about this sleeve construction; I love the way it sits on the shoulder and the lack of extra fabric in the underarm–ideal! Thank you!
LikeLike
This is exactly the kind of thing I had in mind when I wrote my comment for the “seven years” post yesterday! Thank you!
LikeLike
Thank you for this wonderfully informative post! I very much look forward to your weekly email and thi post was an excellent treat.
Thanks also for referencing Elizabeth Doherty’s book. She is incredibly talented and after taking her set-in sleeve class, appreciate the work of all master designers that much more!
LikeLike
Thank you for this LOVELY design and sharing your process. It is very helpful. I am always interested in how a designer arrives at there final result. It adds depth to the knitting experience and I always learn something from it ;) You gave me a knew approach to transitioning between vastly different gauge stitch patterns. Clever you!!
LikeLike
All the knitwear designs in this club are wonderful, and I’m inspired to take a trip to wander the Isle myself. And then there are the whiskeys, thanks to Tom.
Great club, great inspiration – thank you so much!
LikeLike
Thank you, I LOVE the technical piece. cannot imagine all the swatching that went on with that sweater. super.
LikeLike
I saw in the Fringe Association blog (https://fringeassociation.com/2017/02/) that Norah Gaughan has published “Knitting Cable Sourcebook”, which says (directly quoting here) “Each garment pattern is accompanied with recommendations for cable substitutions using Norah’s SSE (Stockinette Stitch Equivalent) method. Each stitch pattern throughout the book is assigned an SSE number – basically, how many stockinette stitches are needed to achieve the same width as the cable. This system allows you to substitute any cable you like for other cables shown in Norah’s patterns – or heck, any pattern with cables in it. This is where this resource book really shines, as it enables any knitter to customize and design her own garment based on her own personal preferences.”
Perhaps this will be a useful reference for some knitters!
LikeLike
VERY nice, and such an interesting technical explanation. Thanks for giving us a glimpse of your technical considerations.
LikeLike
This is a great design and I have long time loved a gansey! This design looks neat and tailored and very appealing and I can read that a lot of thought has gone into this pattern. My concern would be ‘what about muscles!’. Those of us who work at physical jobs have very well developed deltoids and I’m really doubtful that this shaping would accomodate a very muscular man or woman. It would have been interesting to see the fit on a more muscular model (no disrespect to the very trim models!). Love it but have my doubts.
LikeLike
Thanks! And there’s still arm mobility with this technique? The Hansen books say that’s what the underarm gusset is for.
LikeLike
Gansey! Autocorrect struck when I wasn’t looking.
LikeLike
There’s plenty of arm mobility! Nothing restrictive – it’s just a different fit
LikeLike
Very interesting. I have knitted ‘Deco’ and love the top down sleeve construction and the no sew approach to knitted garments! That fits very well, so am looking forward to trying this new design.
LikeLike
Thank you for explaining the short row area and where you transitioned into a semi drop sleeve. I find that knitting sleeves while attached to the sweater body is where my projects remain UFOs so I am working on reverse engineering knitted on bottom up sleeves for a saddle shoulder sweater for my husband. Body ready and sleeves are almost ready to be set up and worked very carefully with your pattern as guidance for attachment. Only from bottom to top with a saddle extension. Plan to seam in the extension. I might have made God smile by telling him my plans but it is worth venturing into new territory.
Maybe this could be your next design challenge and we would all love you for it.
Thank you for sharing your knowledge and beautiful designs with all of us.
LikeLike
Hi Kate, thank you for yet another beautiful design! I am so happy I joined the club when I read about it on your blog (which I’ve been following for years), and can’t wait for the book to arrive. In the mean time, I eagerly await every Wednesday to see the next design. So far, the Kildalton is my absolute favorite, I just hope it will look as beautiful on me as it does on Mel. Reading this makes me understand the amount of work and thought that goes into each and every detail of your designs, really impressive. Thank you. Wishing you all the best from Norway.
LikeLike
I really like that transition from stocking stitch to cable panel. It looks neat and unfussy, and, as you say, very masculine. I read through your description of dealing with the sleeves carefully, but being mathematically illiterate, I struggled to understand them. (My fault not yours) However, as you provide such clear instructions in all of your patterns I don’t really need to worry about that. My brother, John, is skinny and always cold. I think that gansey would suit him perfectly.
LikeLike
The sweater looks divine and the photography is outstanding!!
LikeLike
I particularly like the technical aspects of sweater design, and was interested to read this one. Although I love ganseys the sleeve head looks a bit funny, maybe because that’s not what we usually see in ganseys. I am busty lass, a bit taller than Kate so my guess is that this shape would not suit me – mind you the typical gansey shape with dropped shoulders isn’t ideal either as the shoulder will then be roughly horizontal with my bust (not an ideal circumstance!) What has been interesting from the Inspired by Islay has been the broad cross-section of designs that Buachaille has been used for, though it looks best for colourwork in my opinion. I did try to sign up Inspired by Islay a few weeks in and I got a ‘added to your wishlist’ error message rather than taken through to the payment page, so I don’t know what was going on there. I’d say that this is too masculine for me. Congrats to Tom on the photography though, especially on Kate’s sweater. Normally photographing navy or black designs even in high end photos, you just get a muddy mess. The design on the close-up of the yoke bit is clear. I am not being ‘funny’ here, this is a genuine frustration with even expensive publications like Rowan’s magazines for instance. Mind you, you are lucky to get a close-up with many publications.
LikeLiked by 1 person
I often tell myself to get on with it and design my own stuff, but when I read of the complexity, research and brainstorming that goes into your designs, it quite puts me off! There seems to be a difference in the neck bit on yours and Gordon’s, yours seems lower and flatter, which I like. Is this just a trick of the light, or have you changed something?
LikeLiked by 2 people
Hi – yes – as I mention in the post there are fewer rows in my neck rib but no proportionate difference in the front neck drop.
LikeLike
Oh, sorry, zapped that bit. Many thanks.
LikeLike
But don’t be put off! Designing is fun and not always as involved as this!
LikeLike
This is more than design…it’s engineering ! Very impressive.
LikeLiked by 2 people
A very sleek and beautifully crafted design with such a lot of brain power invested! There’s a lot to think about here for someone like me who is definitely not designed like a stick-armed ironing board. It’s good to hear about your research for the pattern, thank you very much.
LikeLike
My hubby is lusting over this gorgeous design. Perfect for a rugged Cumbrian!
LikeLiked by 2 people
Oh this is too divine. Your skills totally amaze me every time I see one of your garments.
As a beginner knitter I love reading your technical stuff; this is no exception.
And I love the transition on the front, I think it works a treat. I have been dying to have a go at a gansey , this will be the one.
LikeLiked by 2 people