
(Helen Stout, knitting in the round, Busta, 1950. Courtesy Shetland Museum and Archives).
I have recently received a number of messages prefaced with this very question, and I thought that this rather basic introductory essay I wrote about knitting in the round, and steeking, might form a useful addition to my series of posts and tutorials about steeks for those who are curious. The essay is an edited version of a piece that was first published in the Rowan Magazine. Many thanks to the Shetland Museum and Archives for allowing me to reproduce details of garments in their collection.
————————
 Bertram of Minden, “Knitting Madonna”, (detail of Annunciation from the right wing of the Buxtehude Altar) 1400-1410.
There really is no “right” or “wrong” way to knit: different styles suit different individuals, and a wide variety of methods and techniques exist to match an equally wide variety of garments and fabric types. Yet knitting is a community with its own particular trends and followings, and like any other community, notions of “either / or” divide it. Do you knit English or Continental? Top-down, or bottom up? Do you work back-and-forth, or in-the-round? Such questions of technique — of the “best” stretchy cast-off method; of the “right” way to strand the yarn in colourwork — can transform a bunch of friendly knitters into fiercely opposing camps, each with its own passionate adherents. And there is perhaps no technical opposition more fundamental, or more divisive, than that which is perceived to exist between knitting back-and-forth and knitting in-the-round.
The standard arguments of the two camps go as follows:
The back-and-forth faction insists:
1. I like a sleek well-fitted garment. Knitting back and forth allows a garment to be carefully shaped using the best tailoring techniques.
2. The torso is composed of curves and lumps of differing proportions. Tailored pieces create the best lines to accommodate these complicated shapes.
3. In the beginning was the sewing needle. Early humans fitted the first garments to the body by stitching pieces of animal skin together with seams. It must be right.
4. The pattern writers of knitting’s ‘golden age’ created beautiful vintage garments designed to be knit in pieces, back and forth. They knew what they were on about.
5. Flat knitting follows industry standards of garment construction and pattern design. Fashion knows best.
Against which the in-the-round faction counters:
1. I hate sewing seams and finishing. Knitting in the round involves little or no finishing.
2. The torso is basically a tube, supplied with two smaller, narrower tubes. Therefore all sweaters should be knit in tubular fashion.
3. The beginnings of knitting were circular. Medieval paintings depicted the Virgin Mary knitting in the round. It must be right.
4. Folk knitters all over the world have knitted socks and ganseys in the round for centuries. They knew what they were on about.
5. Elizabeth Zimmermann once designed a seamless yoked sweater which was violated by editors ‘translating’ it into back-and-forth instructions. EZ knew best.
While these two positions may seem intractably opposed, in fact, there are elements of truth in both. Though back-and-forth knitting has certainly dominated the standard lexicon of commercial knitting patterns since the 1920s, instructions for many items (socks, gloves, hats) have habitually been written to be knit in the round. And while the knitters of Estonia and Shetland, Norway and the Faroe Islands have produced in-the-round garments for centuries, these women were also talented seamstresses who used sophisticated tailoring techniques to add shape, structure and decoration to their knitted ganseys and jackets. Today, despite the strong antipathy that one method or another can arouse among some knitters, there is more interplay than ever between methods associated with knitting back-and-forth and knitting in-the-round. Commercial patterns are increasingly written to accommodate many different techniques of flat and circular knitting, while knowledge of aspects of both methods — of the speed and ease of knitting in-the-round or of the structure and clean finish of knitting back-and-forth — lends knitters the freedom to modify the construction of garments in ways that best suit them. One such technique — which enables an in-the-round jumper to be easily transformed into a flat cardigan–is the practice that is known as steeking. Because steeking involves taking scissors to one’s creations, it strikes fear into the heart of many knitters. But this technique, common to all Northern knitting traditions, is much simpler to work than many knitters imagine.

(my Rams and Yowes design is “steeked”)
The etymology of the “steek”
The word ‘steek’ has its root in the general Middle English verb ‘steken’ meaning to shut or fasten. By the Eighteenth Century, ‘steek’ was a term common to Shetland, Scots and Northern English dialects and, while it might be used in reference to a closed gate, door, or mouth, it was most often associated with needlework or knitting. In Scots, the verb, ‘to steek’ meant to sew, darn, or knit:
“Wull ee steek this slittin oxter afore it geets ony woare?”
Will you stitch this fraying underarm before it gets any worse?
Or, when used as a noun, the word ‘steek’ simply meant ‘stitch’.
“For want of a steek a shoe may be tint”
For want of a stitch, a shoe may be lost
While in some parts of Scotland and Shetland the word “steeking” still primarily means to stitch or close, in contemporary knitting parlance, the word has mutated and morphed to signify the opposite: that is, for most knitters, steeking now means to cut open, rather than to fasten shut. Thus, in pattern books that have been produced over the past thirty years or so, one finds the word “steek” being used in reference to what, in sewing, is commonly called a seam allowance (a few stitches that are worked additionally to the main pattern). Put simply, then, for today’s knitters, a “steek” is a bridge of extra stitches, connecting two separate pieces of knitted fabric, enabling them to be worked swiftly in the round. Preparing, reinforcing, and then cutting open this seam allowance (the practice now commonly known as “steeking”) transforms the tube back into flat pieces.
Why use steeks?
Steeks can be inserted into any kind of knitted fabric, but their most common application is perhaps in knitting a cardigan using the Fair Isle method of stranded colourwork. This is because carrying and purling two shades of yarn can prove tricky: many knitters find that the purl stitches create significant differences in their tension, or are much slower and more cumbersome to work. But if a steek is cast on in the places where the knitting would have to be divided to be worked back and forth — namely, at the cardigan’s centre front opening, and sleeves — the knitter can work the entire garment in the round, without purling, all the way from hem to shoulders. When the steeks are cut open, the extra cast-on stitches act just like seam allowances around which the knitter can pick up stitches to create button bands and sleeves.
But don’t steeks unravel?
Knitted fabric certainly likes to unravel, but it does so horizontally. Steek stitches are cut on the vertical, making them far less likely to do so. As anyone who has pulled back their knitting will know, wool is also a very ‘sticky’ fibre which likes to retain its shape. If one is knitting with a pure-wool or majority-wool yarn then it is very easy to work a steek simply because the stitches ‘want’ to hold their shape rather than to unravel. That said, because the cut edges of the steek are generally used to pick up a sleeve or edging afterwards, it is useful to reinforce them before cutting to help them deal with any strain they might take afterwards. Steeks can be prepared, reinforced and finished in a wide variety of ways. Taking a look at the interiors of a range of historic and contemporary cardigans that have been knitted in the round, before being “steeked” open, illustrates just how different steeks can be.
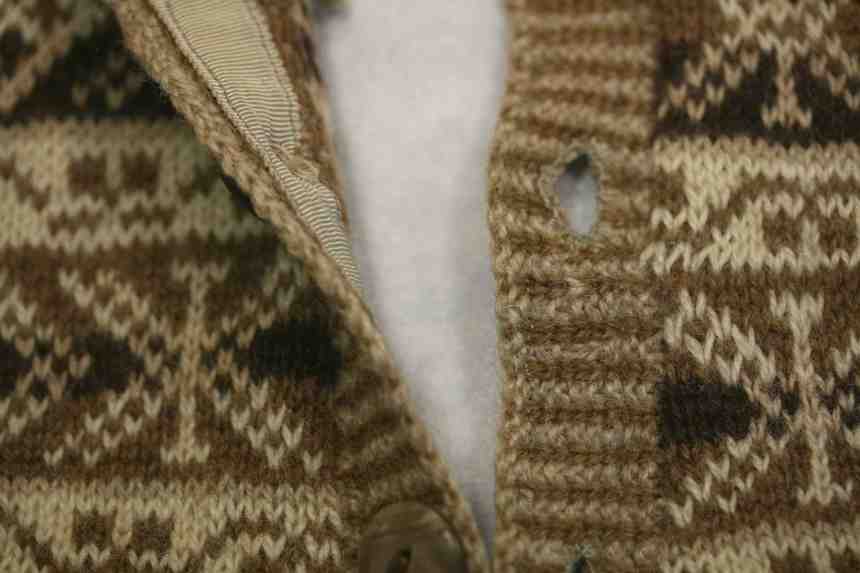
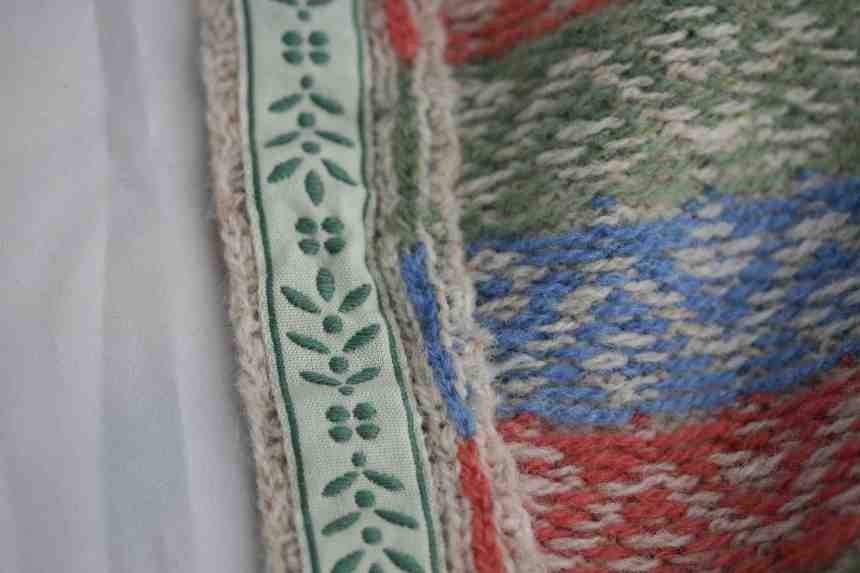
(Shetland Museum and Archives)
This image shows the front button bands of a 1920s cardigan knit in several natural shades of Shetland wool. The band has been worked in corrugated rib; buttonholes have been cut vertically into the band; and machine stitching has been used to attach a reinforcing grosgrain ribbon to the inside. . .
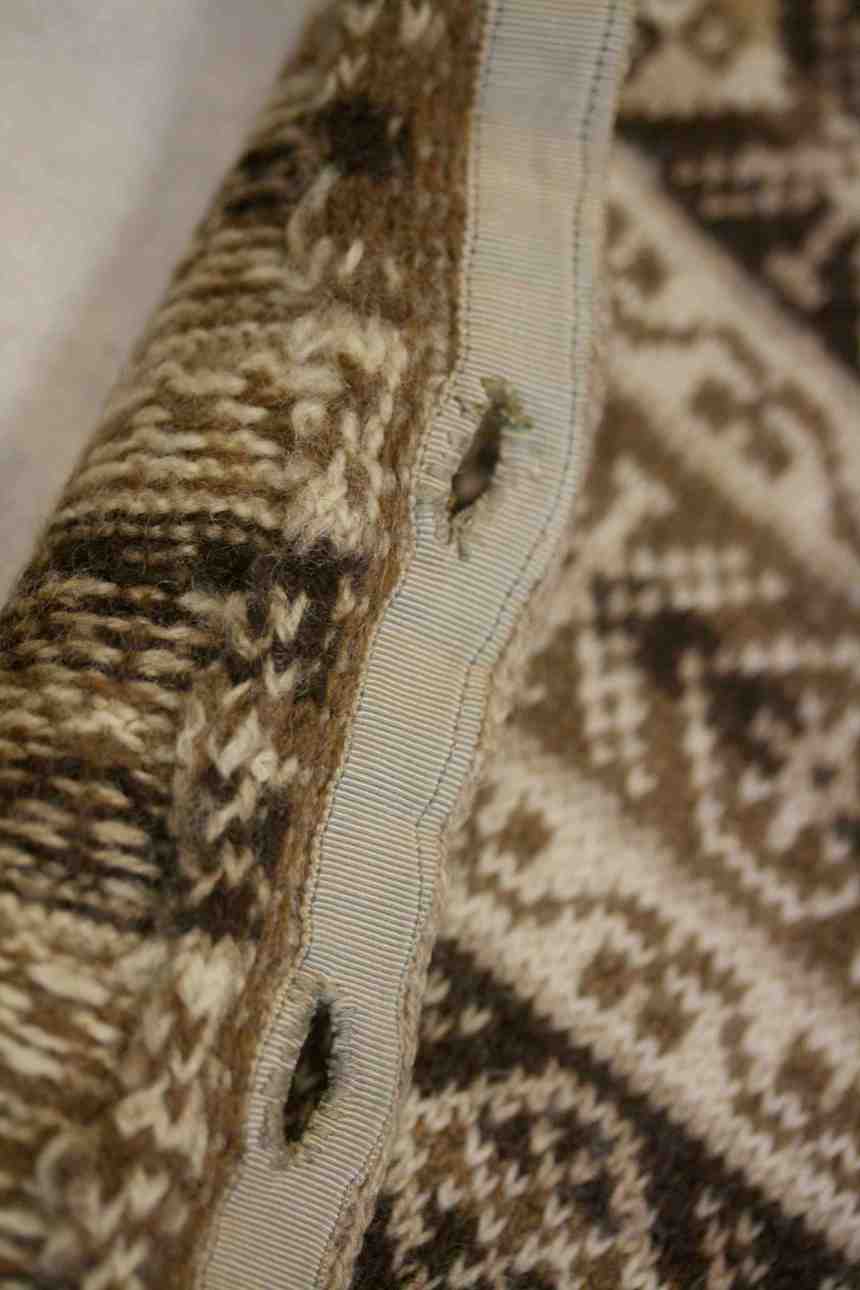
(Shetland Museum and Archives)
. . . here you see the grosgrain button-band reinforcement from the inside, and, to its left, the raw edges of a steek, which has been cut open, and folded back to the inside of the garment, away from the bands. The steek has not been reinforced, or stitched down: because the natural Shetland wool is very ‘sticky’ and has a tendency to felt, the knitter has trusted to the natural action of wear, and, over time, the steek edges have slightly felted together and adhered to the inside of the cardigan. Leaving steek edges ‘raw’ and allowing for felting in this way is a common feature of many Shetland hand-knitted garments, such as yoked cardigans that are still produced and sold today.


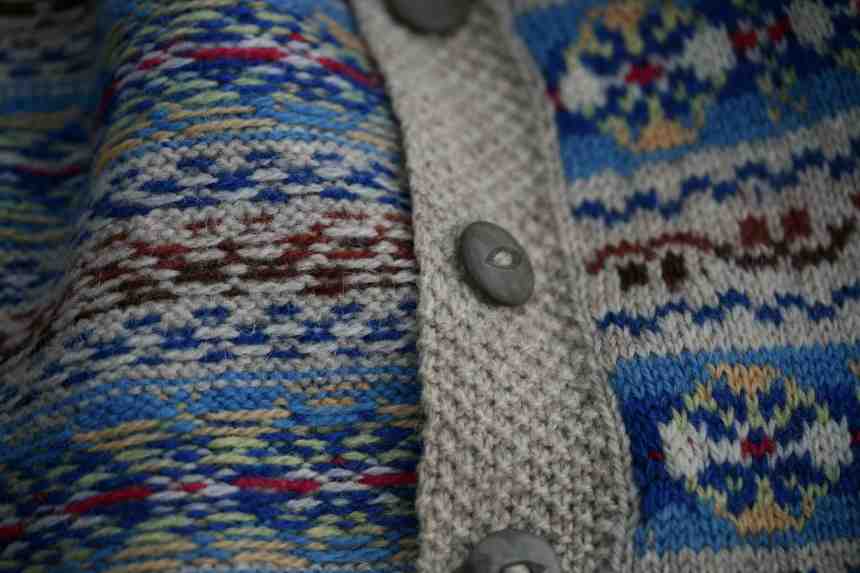
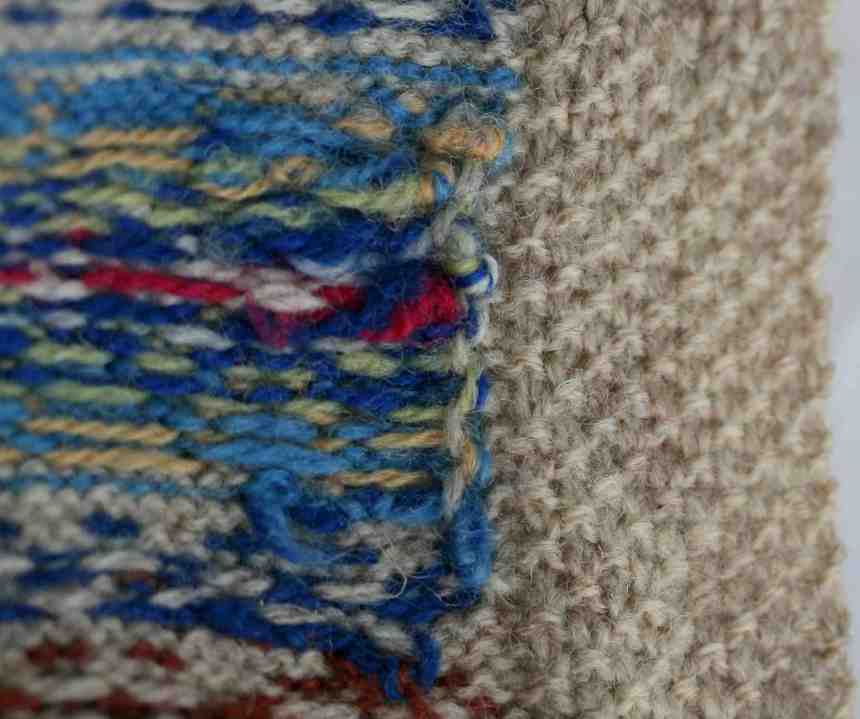
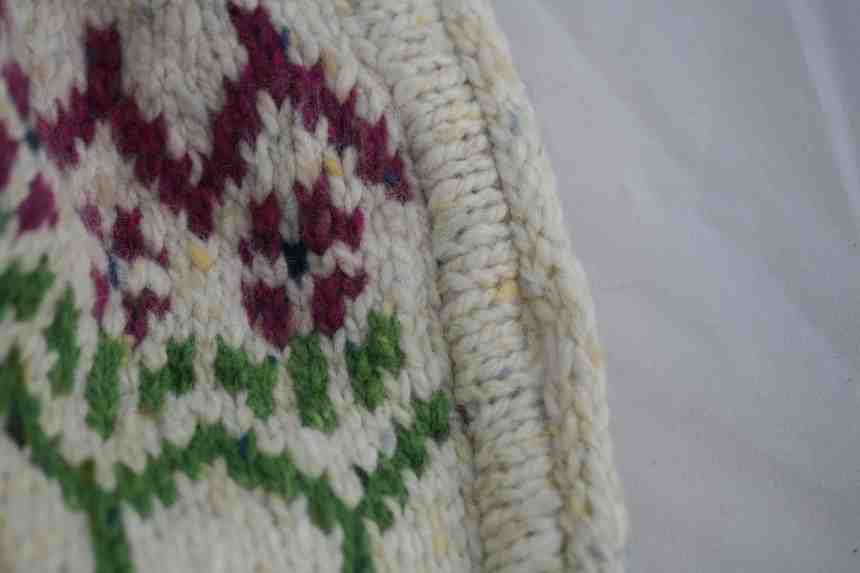
(Shetland Museum and Archives)
Here, a steek has been cut to create the cardigan front opening, and the raw edges have been trimmed back, bound over, and secured to the inside with blue blanket stitch.
Here we also see the front and interior of a button band, illustrating a different and rather more laborious method of securing raw steek edges to the inside of a cardigan. The knitter has either created a wound steek (by winding both strands of working yarn round her needle several times) or a dropped steek (in which the steek bridge is knitted and unravelled). Both methods create a giant ladder of strands, and, when the knitting is complete, the knitter cuts this ladder in two, creating a series of ends, which are then individually woven in to the back of the work. A button band has then been picked up from the edge of the wound steek, and worked in moss stitch. The careful finishing of the steek has made the edges of this 1930s garment extremely neat and durable. (For more on this method, see Tom of Holland’s excellent tutorial on the “knotted steek” )
My own designs use similar techniques of steeking and reinforcing as these earlier garments. Above is a detail of my Ursula design. As you can see, a crocheted steek has been worked, a button band has been picked up along the steek edge, and a ribbon reinforcement has then been hand-sewn to the inside. Rather than leaving the steek edges raw, the crochet reinforcement has been carefully removed, and the steek edges lightly hand-stitched down to the inside.
Meanwhile, in my Bláithín , design, a ‘sandwich’ edging is worked to cover and enclose a crocheted steek, securing the cut edges, and rendering them completely invisible.
As we can see from these examples, there are a wide variety of ways to cut and finish a steek. And, because shaping can easily be worked around a seam allowance, steeking is a technique that can be used to knit just about any garment or object. Steeks easily lend themselves to the creation of tea-cosies and blankets, dog jackets and tank tops. Once you are able to cut up knitted fabric without fear, you really can make just about anything.
Want to learn how to work a crocheted steek, or steek “sandwich”? Find the rest of my steeking tutorials here! .



When you make a garment with steeks, stranded color knitting, what do you do with the strands as you make the steeks? And in sections with one color like ribbing? What about working with no-wool yarn? I made a sweater with stranded color knitting, acrylic yarn (that being all available to me), and, not finding any clear explanation of making the steeks, used the colors in the steeks, with another yarn. I reinforced it with crochet, as in instructions, but when I cut it, I got a mess of little ends of all the yarns, and parts of the steeks unraveled. I am going to cover the steeks and ends with grosgrain ribbon and hope for the best. However, since I’d really like to do more projects with steeks – I even have patterns already in mind–I won’t like to have the same problem again! Thank you for any help you can give.
LikeLike
Hi Misty, it will be easier to reply fully if you email us: info@katedaviesdesigns.com
LikeLike
Hi Kate,
I’m a french knitter and I love your blog and your models.
I learned the steeks method for the first time at a Shetland Wool Week workshop, last september. It was very interesting and I enjoyed it.
Now, I knitted my first model with steeks and I read your explanation before starting the reinforcing and cutting. I’m a little afraid but I’m getting it done !
For french knitters, it’s unusual technique and difficult to understand because the best explanation are in english. I have a blog and I would like to explain this technique in french. Do you allow me to base my explanation on yours ? I think,it will be very usefull for french knitters.
Thanks a lot for you answer.
My blog is Petit mammouth à poil laineux (little woolly mammoth). You are welcome there !
Sorry for my english…
Natalie
LikeLike
Great photos! As an archives worker, I love that you worked with archival resources. That is something I’ve wanted to do too, but sadly my area doesn’t have a strong knitting heritage.
LikeLike
Like Elaine, I think the cardigan with the moss stitch bands could have been worked flat. The bands seem to go in the same direction as the body, perhaps they were knitted at the same time, but with separate balls of yarn in an intarsia style?
I do vaguely remember making something similar for my daughter about thirty years ago!
LikeLike
Thank you so much for this – I have been putting off making steeks for ages, but your clear photographs and descriptions have boosted my confidence! X
LikeLike
thank you for yet another! wonderfully, insightful knitting article. and a Happy Anniversary in regards to you wonderful home!
LikeLike
In Dutch, we learn to knit with the following words: ‘insteken (steken=steek(s), omslaan, af laten glijden’
Steken means ‘to poke’ or ‘to stab’ in Dutch. We have many words related to the verb ‘steken’.
LikeLike
Thank you for this interesting recap! I made my first steek (without tears) with your Bláithin and I am so happy with this method (as I “purl” too loosely). A new world in cardigan knitting opened to me!
Then I discoverd the Icelandic wool. And now I can’t wait for your next patterns, hoppefully using this yarn…
LikeLike
I am so glad you mentioned the knot method Elaine. I used this a long, long time ago in my late twenties and totally forgot about it until you posted about it. I am not very confident at steeking so will need to give this a try with my next colour work project.
Thank you for another great post Kate. I really must make the Ursula cardigan, every time I see it I love it more and more. I love the ribbon too that you used to reinforce the button band.
LikeLike
Brilliant Elaine. I will use this method with Kate’s yokes, and will doubly enjoy the knitting, knowing at least for the steeking bit, I won’t have a break down ( :) ) . Still want to work on my steeking though.
best to all, robin.
LikeLike
Thanks for a lovely post. Your example with the moss stitch band interested me as this cardigan could have been knitted flat. One method I learned was to knot the two yarns together leaving about a couple of inches of a tail, knit the row, then break off the yarn at the end, again leaving a couple of inches. Continue doing this on every row always keeping the right side facing you so no need to purl. To finish the garment knot the ‘end of row’ yarn ends together, knit on the button bands and finally sew in the ends. Handy for knitting yokes if you’re not confident in cutting your knitting. I’m from Shetland and agree with Donna that ‘steek’ wasn’t used much here before the rise of the online knitting community.
LikeLike
Elaine, many thanks for this – I think you may have solved the mystery of that cardigan for me. The armholes were definitely machine sewn & cut open, but I wasn’t convinced of my own interpretation of what was going on at the front. I think you have cracked it!
LikeLike
Hi Kate,
Thanks for including the “Knitting Madonna” from the Buxtehude Altar,but this is not the depiction of the Annunciation, that is on a different panel following the picture of the birth of Mary. The “Knitting Madonna” or the Visitation of the Angels is on a panel which includes The Birth of Christ, the Annunciation to the Shepherds and the Wedding at Cana. When the whole picture is seen, the angels are carrying a crown of thorns, a cross and what look like three spindles of wool. An ordinary domestic scene takes on an extraordinary significance. Mary is also knitting a seamless garment which fits with the Cross and Crown of Thorns as prefiguring the Crucifixion where Christ’s seamless robe was gambled for by soldiers at the foot of the cross. It is a remarkable and revealing scene, the child Jesus looks up at the angels while his mother knits, a moment of peace.
Heather
LikeLike
Heather, thanks so much for this – absolutely fascinating. I rather wish I could see the whole panel. Should I correct the attribution as “The Visitation of the Angels”?
LikeLike
Hi Kate,
Yes, maybe the “Visitation of the Angels” would be better. The whole altarpiece is very beautiful. Thanks for all your knitterly inspiration!
Heather
LikeLike
Thank you Heather and Kate. I know it is roving far from steeks but now I have had a look at the whole altarpiece on the web I understand it better. Helen, may I link your answer to the Knitting for Peace website (not the whole steek article) as there are many supporting groups who would find it interesting if not inspiring while they knit for charity. Thea
LikeLike
Will enjoy reading this Kate, when I am not so tired. I almost had to be sent for steek rehab after destroying at the steek stage – yes, completely destroying – Biathin (sp?) Jr, which was intended for my granddaughter. As I already know I am going to buy the yoke book, I will review a clutch of tutorials and blogs in preparation for the moment of the big cut. Off to bed. Goodnight, robin
LikeLike
I have done several steeks……..I think mostly children’s jumpers but I do also remember sewing with a machine before cutting and seem to think it might have been Norwegian……..thanks for the etymology of the work.
LikeLike
The blogosphere is an interesting place–I had never heard of steeking until today, when I read two separate posts about it!
LikeLike
I credit you with reviving my love of knitting and opening up a whole new world of colour, yarn, people to meet, new techniques and challenges all the while making me very homesick for various parts of the British Isles. I just had to make Sheep Heid and the fun of it has led me onwards to being competent enough to be the first to post a completed Machrihanish on Ravelry ( Boasting, but I’m very proud of it). These days if it hasn’t got steeks I don’t want to know! Machrihanish #2 is planned reversing the red and blue and changing to red/blue corrugated rib. The swatch looks good and the extra yarn is on its way from Shetland.
I’m so happy to read that your health is good, and that you continue to thrive in your new surroundings. Best wishes to you, Tom and Bruce for a life of joyful contentment.
LikeLike
I love this article so much! The definitions of steek and the different styles of steeks are very interesting. Your historical research on this is fabulous! Thank you!
LikeLike
I remember I was a bit surpised when I first read that this was published in Rowan magazine. They have so many gorgeous colourwork designs, but so far I haven’t seen one that’s not worked flat. For example this free pattern recently published, a nice cardigan, but I would never work it flat: http://www.ravelry.com/patterns/library/tilt-8
LikeLike
I love this post! I think I’m completely reassured about unraveling now. ;-)
Recently I placed a link to your steek tutorials in my own blog about it.
LikeLike
Steeking certainly seems to be catching on. I’m teaching a class in it (“Dare to Cut”) in November at a local retreat, and based on the retereat sign-up lists, it’s the most popular class. I started “steeking” back in the early 1980s, after reading EZ’s books, and later I took classes with Alice Starmore. Can’t imagine doing stranded knitting back and forth, although I have nothing against those who do. There’s no right way to do anything in knitting.
LikeLike
Very interesting, thanks. I like to knit in the round but have never been brave enough to steek.
LikeLike
A very interesting and highly informative post – as always. Thank you. I love learning about the etymology of words. Steek is the Dutch word for stitch and in German it’s Stich. There are many similarities between Scottish, northern English words and German words.
LikeLike
I’m German and until just now I didn’t realise that steek and Stich are “related”! To me, it was always related to Steg (which can be a footbridge, plank or bar) because that is what it is to me: a bar separating the two front halves from each other.
Thank you and Kate for enlightening me!
LikeLike
Thank you for this very interesting post, it’s always amazing to see how many different ways you can do basically the same thing and I think the fact that there no right or wrong way to knit is a great thing to remember, especially when someone is starting to knit. The term steek is very much a new term among my family members and acquaintances that knit. They would just speak about “extra loops”. One very experienced knitter phoned me to ask what I meant by a steek when I described making a Fair Isle jacket on my blog, she had looked in the Shetland dictionary and it meant to “clench as in fist”. She was very confused! We would speak about “steekit” mist as in “thick” but I don’t know if that term has the same root – a knitted steek can be quite thick when It is finished! Also – love the image of the Madonna knitting in the round – wonder if she used a knitting belt?!
LikeLike
Yes, I have to say I am curious as to precisely where the notion of a “steek” being a place to cut came from — what really astounds me is that it means the opposite of what it did originally! Have also wondered whether “steekit” mist is so called because it is “closed” or “drawn in”?
LikeLike
In Afrikaans, ‘steek’ as a noun means ‘stitch’, and as a verb ‘poke’. (I’m always tickled to see what I thought were Afrikaans words popping up elsewhere.)
LikeLike
Excellent. Thank you very much. So well put.
LikeLike
Great post. Can’t get over the Knitting Madonna! Who knew?
LikeLike
Wonderful…especially as today is the Feast of the Assumption for those who survived convent schooling!!!! So there may be a knitting group in heaven .lol.
LikeLike
Thank you for this explanation, I enjoyed seeing the pictures from the Shetland Museum. When I visited the Shetland Islands this past July, I was lucky enough to have a personal tour at the museum with Cathie on a quiet Sunday afternoon… it was fascinating to hear the stories of some of the knitted items on display. When I visited Reykjavik, Iceland, as part of the same trip, I bought a pattern and Lopi and Alafoss yarn to make a steeked cardigan, my first “steeking”!
LikeLike
Thank you for the lovely photos and instructions!
Sheila
http://sheilazachariae.blogspot.com/2014/08/barefoot-sandals-knit-kit-and-charmed.html
LikeLike
What a lovely post. I am a convert to knitting in the round, having been resolutely in the first group. Have done three steeks now on Blaithin, Ursula and Plum Frost (from another designer). My real problem was that I was hopeless with a set of double pointed needles, then I initially found circulars difficult. I was of the opinion that I needed the right needle firm and stable under my right arm.
I still find those first few rows a bit wibbly wobbly, but one huge benefit that I have noticed is that the weight of the knitting as it grows is more evenly distributed over the circular needle so it is more comfy for my right arm and hand.
LikeLike
Reblogged this on marthabilski and commented:
love this
LikeLike
I always wondered why it was called a steek, but was too lazy to look it up. Does this post indicate that your Yokes collection will be released soon and will include some steeked items?
LikeLike